Friday, June 30, 2017

Friday Night Videos

Friday Night Videos

Folks, we're got a holiday weekend of sorts coming up. Yeah, the Fourth is on a Tuesday, which means a lot of us have to work Monday, but still, it's a short work week! Who better to get us in the proper frame of mind than Jimmy Buffett? I remember when "Who's the Blonde Stranger?" came out in 1984. It was during Jimmy's country phase, and it was a decent hit for him on the country charts at a time when chart success had started passing him by. I remember it was a heavy rotation favorite on KULM that summer, and I heard it so often I knew the lyrics by heart. He's always had a kind of special relationship with Texas, which is to be expected considering the fact he wrote "Margaritaville" in Austin. I like how he gets the distinction of different parts of Texas in the song, and really, in the 80s Galveston was kind of a hedonistic Gulf Riviera, still trying to find its identity in the aftermath of the casino closures two decades before. Jimmy looks like he's having a blast making the video, and you have to appreciate the fact that "Frank" is wearing an A&M jersey. It's a silly song, with an even sillier video, and never fails to make me smile.

Previously on Friday Night Videos... ELO.

Now Playing: Wynton Marsalis Quartet Live at Blues Alley
Chicken Ranch Central

Wednesday, June 28, 2017

Sailing Venus: Verdandi Outpost

I am remiss. It's been some months since I last posted an update on Sailing Venus, and there's really no excuse for that. I have not abandoned the project, although work progresses slowly as usual. My writer's group continues to meet, and provides valuable feedback every few weeks. More importantly, it provides a looming deadline that inspires frantic writing whenever time gets tight. That, possibly more than anything else, has kept me plugging away at this novel despite the myriad interruptions, distractions and setbacks that come my way.

Between you and me, chapters 6 and 7 were real bears to write. Originally envisioned as a single chapter, a good chunk into 6 I realized there was no way I could cram in everything that needed to happen without giving all the events and character moments short shrift. At that point I did what writers do and split the chapter in two. For some reason, twice as many words took me four times as long to write. With 7, in particular, I knew where things ended up, but little of what happened on the intervening pages. That proved to be quite the learning experience for me, and necessitated quite a bit of crash research into the Pyrenees Mountains (I was probably more surprised by that than you are).

With those trouble spots behind me, I'm happy to report that chapter 8 is also complete, with work on chapter 9 begun. I've topped 34,000 words--possibly, but not definitively--the most words I've committed to a single work of fiction since The Broken Balance, a terrible, derivative high fantasy mess that I completed when I was 17 years old. That word count places me beyond the 1/3 mark but not yet at the midpoint of the novel. I've hit two of the big milestones set up in my outline (which I'm already deviating from significantly, but it's still proving useful) with the first big action sequence on the horizon. The next two chapters are clearly defined in my head, and have been generally present as a concept from the earliest glimmerings of this story as a potential novel. It's always nice to make these long-gestating writerly ideas tangible on the page.

As I look at my calendar, I see I have 18 weeks to go before the World Fantasy Convention arrives in San Antonio. That gives me 16 weeks--I have two weeks coming up where I will be traveling and unable to do any meaningful writing--during which to complete roughly 12 chapters. At a glance, that should be do-able if I just hit a chapter a week. But I've been averaging maybe a chapter every two weeks, so that looming deadline is nervous-making. In my defense, I seem to be producing good words on the page. My writer's group members have varying degrees of experience, some being published a lot more than me, others a lot less, but they all have offered valuable insight at various times. The last two meetings, more than one has stated that they're reading my submissions less to offer critique and more to find out what happens next. I'll take that as a win.

Here's a sample from chapter 8. Erica's impulsive, leap-before-you-look nature has gotten her into progressively worsening trouble, but that's barely scratching the surface of what awaits the poor girl. Enjoy.

A confusion of voices assaulted her. Strong hands grabbed her and hauled her up from the floor. Ozone tinged the stale, steamy air. Erica blinked. Several ill-defined figures stood around her, all shouting at once. She blinked again, trying to focus. Wan yellow light streamed in through a row of small portholes. Bunks. The portholes were in open bunks, the privacy doors rolled up. Blankets and personal items lay strewn about.

"My dad," Erica managed at last. "I need to see my dad."

"Who are you?" The speaker stared at her intently, his sagging, sallow face crusted on one side with dried blood, his wiry hair glistening with sweat.

"My god, what's wrong with her skin?" a second voice asked.

Erica realized her tattoos had taken on a linear fractal pattern. In the poor light, it appeared as if maggots swarmed beneath her skin. Annoyed, she turned them off.

"I'm Erica Van Lhin. My father's Geraard Van Lhin, Risk Management Chief Inspector," she said. "He's here with his inspection team. I need to see him. Now!"

The cascade of voices fell silent. The Venusian winds howled mournfully outside.

"Child," said a bald woman gripping a bunk for support, one arm in a sling. "The three of us you see here, we're... we're the only survivors.

"Your father's dead."
Now Playing: Ixtahuele Pagan Rites
Chicken Ranch Central

Tuesday, June 27, 2017

Chicken Ranch anniversary: Dolph Briscoe dies

On this date in 2010, Dolph Briscoe, the 41st governor of Texas, dies. Briscoe, a long-time Uvalde rancher, is generally remembered fondly from his terms as governor for being a decent guy. But his administration did earn some dubious distinctions. Briscoe was the last Texas governor to serve a two-year term and the first to serve a four-year term. He undermined two efforts to rewrite Texas' abysmal constitution (which remains a trainwreck to this day). Briscoe once appointed a dead man to the State Health Advisory Commission, and if what I've heard is true, called a press conference in the aftermath to reassure the press and public that he hadn't lost his grip on sanity.

But what most people remember him for--and which doesn't appear in most official biographies--is that he is the governor who ordered the closure of the infamous Chicken Ranch brothel in La Grange. Ironically, Briscoe had no actual legal authority to order the Chicken Ranch (or any other brothel, for that matter) closed. But he did, hoping nobody would call his bluff. Fayette County Jim Flournoy certainly knew the governor had no authority to do so, but acquiesced to Briscoe and effectively ended a surreal two-week media circus that captured the attention of Texas as well as the rest of the country.

Governor Briscoe died after ignoring my interview requests for the better part of a year. Way to sidestep that writer, Dolph!

Inside the Texas Chicken Ranch: The Definitive Account of the Best Little Whorehouse is available from Amazon.com, BarnesAndNoble.com and anywhere books are sold.

Now Playing: Ixtahuele Call of the Islands
Chicken Ranch Central

Wednesday, June 14, 2017

Tiki build-along, pt. 7

At this point, I enter uncharted territory with my tiki build. A popular and common component of home tiki bars are carved baseboards and other assorted trim. I have a full-sized router that I've used on my office build, mainly to carve out dados for bookshelves, etc. It's large, however, and not entirely suitable for the more intricate design work of carving baseboards. So I went to Harbor Freight, that emporium of cheap tools imported from China, and picked up a super-inexpensive trim router using a 40 percent off coupon. This small router isn't nearly as powerful, and I doubt it will last as long as my other (15 years now) but it's nimble and better suited for detail work.

I picked up some 1"x6" Ponderosa pine boards from McCoy's (they were cheaper than at the other options, plus the boards had a smoother, more polished finish as opposed to the rough cut of other places). I designed a simple, common alternating triangle pattern using Photoshop and printed it out. Using an Exacto knife, I trimmed out the pattern then traced it onto a more robust piece of poster board. After trimming that out, I taped it to the boards and traced the pattern onto the wood. If that sounds like it's convoluted, or a lot of steps, well, it is.

One thing that's nice about the trim router is that it has a guide attachment that allows one to cut a groove at a set distance along any straight piece of wood. My big router doesn't have that, and to get straight lines I have to measure and clamp down a guide board that's both straight and long enough... it's a pain. This is much more effective, although I have to confess that on my first attempt I didn't bolt the guide tightly enough, and it came loose resulting in an irregular cut. But don't tell anyone.

Once the straight-line grooves were cut (I'm using a quarter-inch half-round bit at little more than an eight-inch depth, for those interested in such things) I set to work on the triangles. Each triangle is made up of six parallel cuts in progressively shorter lengths. As they're oriented at 45 degrees to the edges of the boards, setting up a dependable guide would be more trouble than it was worth. After a tentative experiment on a piece of scrap wood, I knew that I was not yet experienced enough to make the cuts freehand.

I ended up splitting the difference, so to speak, and used a short, straight piece of wood as a floating guide, holding it down with my free hand. This turned out to be remarkably efficient. I ended up taking about two and a half hours to rout the first 8' board, and only around an hour to do the second. This is one area where experience pays big dividends. The work went very much faster (with fewer missteps) as I progressed.

Next up, fire! On all the big home bar build threads over at Tiki Central there are references to artificially aging the wood used for trim, so it has a rustic, live-in look. The first part of this involved roughing up the carved wood with an angle grinder. Once again I headed to Harbor Freight with a 40 percent off coupon and picked up a cheap angle grinder. With the spinning heavy-grit wheel I gouged and grooved and scuffed the boards until they looked like they'd suffered 40 years of neglect in some out-of-the-way dive. Then I applied my little propane torch. I picked this up back in December to heat-tree the bamboo I'd started harvesting (which is something I've yet to discuss on this build-along. I will have to rectify that in the future). I wasn't sure what to expect. How much should I burn the wood? How black should it get? Am I going to start a huge fire and have to evacuate the neighborhood?

Fortunately, once you clear away all the sawdust (this is an important step, so don't skip it--sawdust is eager to burn) the wood is reluctant to burn as long as the flame keeps moving. It doesn't even have to move fast. I just brushed it back and forth like a gentle paint brush. Some parts of the pine darkened instantly, while others held onto their light coloration despite multiple passes. You're not burning the wood so much as scorching it.

At this point, I still wasn't sure if I was doing this correctly, or what the real point was. I applied a wire brush--the same type used to clean a barbecue grill, or used in welding if that's your thing--and rubbed down the scorched wood. The results were dramatic. The blackened, carbonized areas came off as soot, leaving the wood a much more uniform brown. But the biggest change was in the wood's texture. I've seen references to applying flame to "raise the grain" but didn't quite grasp what that meant. Give it more visual contrast? Expand it? Well, I'm here to attest that "raise the grain" is to be taken literally. Whether the grain actually rises or the softer wood between burns away is irrelevant--the end result is a wood surface with dramatically enhanced surface texture, akin to old barn wood that's been exposed to sun and wind and rain for 30 years. Only this way, you get the aged wood appearance without the cracks and rot that accompany exposure.

After cleaning away all the soot and sawdust, I stained the baseboards with Minwax Special Walnut and then applied a couple coats of Spar Urethane to protect the wood from moisture and the elements in general. I've posted so many dull stain and varnish photos for other projects that I'm not going to waste the space repeating. Just imagine several days have gone by and it's all dried nicely, okay?

Returning my attention to the back bar, the bar surface desperately needed trim applied to at least look complete. Since my intent is to match my original tiki bar design as much as possible, this meant getting some 3" moso bamboo clums from Bamboo Branch in Austin. Since I'd learned a lot more about bamboo than I did last year when I built my original tiki bar, I knew I needed to heat treat the culms to give them a richer color and bring out the contrast at the nodes. I have to say, burning 3" culms with my little propane (butane?) torch is a lot more time-consuming than the little 1.5" culms I normally work with. It takes more heat to reach critical mass and achieve the color change with the thicker wood. The result is very nice, and worth the effort.

The surface of the back bar, with the plywood base and laminate surface, is right around one inch thick. I took masking tape and, laying the culms straight, applied the tape to act as a straight cutting guide. Splitting bamboo in half is relatively straightforward, but cutting a strip out of a culm is more of a challenge. I haven't see how other folks do it, but I used a jig saw with a fine toothed blade to make my cuts. When I got to the solid nodes, I lifted the back of the saw to go into it at a 10-degree angle, and that seemed to work well. Once I got both sides cut and lifted the strip out, I used a small hammer to knock out the remaining node wood so the culm would fit on the bar top better.

I test-fitted the culm, and used the jig saw to trim away any areas that were sticking or in the way. Once I got the pieces going on the bar satisfactorily, I measured and made 45 degree cuts on the bamboo trim using my mitre saw for the corner joins. I used long paneling nails to attached the bamboo edging to my tiki bar, and honestly, that was a mistake. Those nails weren't strong enough to hold the bamboo steady, and there's been progressive shifting ever since. This time, I saw no other option than to use heavier wood screws. This meant drilling a pilot hole, then using a bigger bit to cut out a countersink hole.

After attaching the bamboo culms with the wood screws, I covered them with wood putty. The next day, once the putty was dry, I sanded it smooth with 220-grit sandpaper and applied some Minwax Special Walnut stain. The screw-holes are less obvious, but still not invisible. I'll apply some dark walnut when I have time and see if that helps it blend in better with the scorched area of the nodes.

One big downside of how nice this bamboo bar trim looks is the fact that the trim on the tiki bar--which I built before learning about scorching bamboo to bring out color and contrast--looks dull and dowdy in comparison (as can be seen to the left in the final photo of this post). I don't relish the thought, but as some point I'm going to tear apart the original bar, sand down and scorch the bamboo trim to give it the same pop as the back bar.

With the bar trim in place, I was ready to install the baseboards and bamboo tambour panels. You know, show some actual visible progress. A sticking point is the siding on the patio--it's overlapping fiber cement, which is nice and durable but not conducive to flush application of veneers. To compensate, I bought several 8' furring strips and sliced them lenghtwise on my table saw at a 4 degree angle (give or take). The thick end of each trimmed strip is about a quarter inch thick, which matches up with the overlap end of the siding. The 4 degree cut, when attached to the siding, presents a vertical surface upon which I can apply far more interesting veneers. I coated all the cut strips with Flood CFW-UV for added protection, even though they won't be directly exposed to the elements. Furring strips are notoriously non-durable, and I don't want them rotting out on me.

I attached the baseboard using a 1.5" exterior grade wood screw, drilled through a pilot hole into the backing furring strip. I need to go back with dark brown paint and cover up the gray screw heads, which draw the eye. I'm not going to caulk this, because there may be some reason in the future to remove the baseboard and/or wall covering. Not that I plan to, but that's the approach I plan to take.

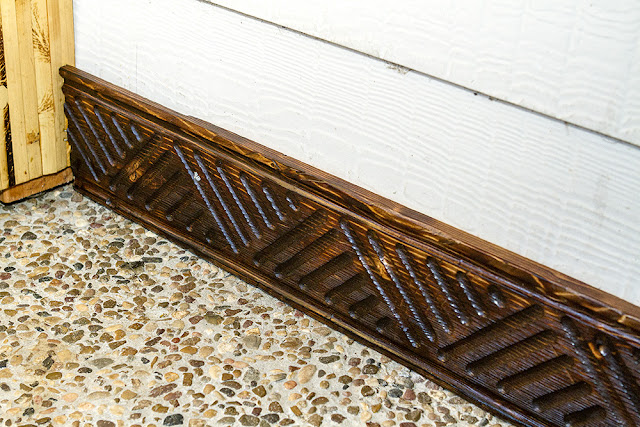
I remember now that I forgot to mention one thing when discussing the routering of the baseboards above--on the backside of the boards I cut an eighth-inch deep, half-inch wide groove along the top side of the board. Why? To serve as a pocket into which I shall insert the lower end of the bamboo tambour panels. I placed a cut furring strip against the siding corner nearest the top end of the tambour panel (I'm fastening the strips to the wall with exterior wood screws, if you haven't guessed) and then did a test fitting of the tambour. Unfortunately, the bamboo slats in the tambour are fairly thin, and bulged out in the middle, which necessitated a second furring strip in the middle. Once everything lined up, I stapled the tambour into place, taking care to fit the staples between the slats. This is the same process I used on the back bar itself, although I coupled that with glue. Glue is not practical in this situation, and even if it were, I'm making the wall coverings so that they can be removed fairly easily if necessary. At some point I'll come back with tan paint and a fine-tipped brush to disguise the handful of staples that are visible, but for the most part they can't be seen unless you're actually looking for them.

This is a little out of place, but I forgot to include it in my earlier installments. In addition to the wall coverings being removable, I also built the back bar to be removable. It's solid and not going anywhere on it's own, but since I plan on adding a sink, I don't need any accidental shifting disconnecting the water or drain lines. But I didn't want to permanently affix it to the wall with nails or screws. I settled on eye hooks on either end. The anchors are small but surprisingly solid. The back bar's not going anywhere, but it was a snap to pull it away from the wall to facilitate the installation of the tambour panels.

And this is the end result, kinda sorta up close. I like that I decided to go with the tortoiseshell pattern. It adds visual interest. And by cladding the back bar in tambour, it looks of a piece with the wall.

And here's a slightly wider view, placing the back bar in the larger context, with the tiki bar front left. Before the tikification began, there were quite a few elements of the patio that we either didn't pay attention to, or thought were kinda neat on their own. As my upgrades continue, those elements are starting to clash badly. Case in point: That round porthole window. We thought it cute when we moved in, but it's damn ugly in context now. The Wife and I discussed this last night. We like the concept, but the execution is pretty bad. I'd thought to put that off for a good long while, but now I think I'm going to have to tackle it sooner rather than later. Complicating matters is the fact that it's a really large window, and available nautical-styled portholes, be they authentic or fake, are generally quite a bit smaller than needed here. I'm sure I'll figure something out, but nothing is ever easy...

Now Playing: Stan Getz The Bossa Nova Years
Chicken Ranch Central

Wednesday, June 07, 2017

Tiki build-along, pt. 6

So, last update I'd completed the frame of my back bar and attached the bar top. Next up: Bamboo tambour panels. I realized early on that my tiki bar build, being outside, would attract all manner of dust, dirt, insects and assorted debris. This necessitated serious attention to ease of cleaning and materials that wouldn't collect the crap so readily. I'd originally intended to line the walls with bamboo fence wainscotting, but the more I thought on this the more I realized that would just provide harbor for all sorts of spider webs, wasps and random gunk to hang out in. Then I came across this thing known as tambour panels. I'm still not clear on the origins of the name, but essentially these are rolls of flat bamboo slats attached to a cloth backing. Think of it as flexible wood paneling. The price was right, it appeared easy to work with and it came in a variety of aesthetic styles. I chose tortoiseshell bamboo, which I felt matched the look of the bamboo culms I'd harvested and torched on my own (more on that later).

Here's a closer look at the pattern. The bright sunlight washed out much of the color, but it really is an attractive bamboo. I coated both sides of the panel with weather protectant because, again, while they'll be sheltered from direct exposure to the elements, humidity still varies wildly and my experience with the outdoor speakers showed that reflected UV was a significant issue. I learned during this process that many weather sealants are penetrative, that they depend on being absorbed by the wood surface to work internally. Bamboo doesn't like to absorb such things, so surface treatments are most effective. Live and learn.

Around this time, I decided the back bar should match the wall. I knew I wouldn't use a palm thatch front like on the existing tiki bar. I thought I'd go with bamboo, but that thinking changed to using the tambour panels for the back bar as well. That would unify the look of the back bar and the wall. Being easier to work with was no small factor in the decision as well. The first step was to remove the three cabinet doors from the back bar so I could cut the tambour to size and attach it. Below is the largest door, the one covering the water spigot and propane connection. Since we use that spigot regularly for washing down the patio, adding water to the pool and watering plants, I needed to include storage for the water hose. I attached a hose rack to the door, because this kept the hose out of the way of other things that need to utilize that cabinet space.

The downside of having the hose rack on the door is that the bolt heads stick through the front. I'm sure there are other solutions, but I couldn't come up with any during the build, so this is what I'm working with. A surface that's not smooth. I applied a goodly amount of Titebond III to the edges, corners and space around the bolt heads. As I've written elsewhere, Titebond III is relatively expensive, but close to the strongest wood glue you can buy.

I filled in the remaining space with Titebond II, which is a pretty strong glue in its own right, then used a folded scrap of paper to spread it all evenly across the door.

After that, I applied the cut bamboo tambour panel to the door and wiped away excess glue oozing between the slats before I clamped it down. There was lots of glue, and the last thing I wanted was the boards I was using to clamp the tambour down getting glued to the door as well. So I laid wax paper across the tambour, then laid down scrap boards and finally clamped everything down for 24 hours.

I'd used magnetic clasps to keep the doors closed on the back bar, and earlier had learned they weren't easy to open with my bare hands. They needed handles. Fortunately, I had a lot of moderate-sized bamboo culms drying in my garage I'd harvested back in December and January. I'd torched most of it, so there were some attractive pieces to work with. I picked out three bamboo joints that were roughly 1.75" thick and 6"-7" long to serve as handles. Here's where things got dicey: I didn't know how I'd make them into handles. I had a vague notion, but I didn't know if I could make it work, or if the bamboo would even tolerate my abuse. I marked the bamboo where I wanted the support bolts to go, and drilled that out. Unfortunately, despite knocking out the solid piece in the bamboo nodes, there was not enough leeway to get the 2" long screw and washer into place. So I drilled the hole out at an angle from the inside, going through the node (below).

This made things much easier. I could slip the bolt directly into the hole through the node now, but since the drill hold was much larger, I worried the bolt head would tear through the bamboo when tightened/stressed. So I added a washer to the bolt. Now the bolt wouldn't fit through the node opening, so I ended up slipping the washer in first, then fishing around inside the bamboo with the end of the bolt until I speared the washer, then sliding the combo through the hole. Repeat this six times.

Everything after that was amazingly easy, which is to say, not at all the way my projects usually turn out. I marked the locations of the handle bolts on the cabinet doors and drilled holes through the doors. I found a slender length of bamboo I'd torched and cut half-inch segments with which to sheath the bolts for aesthetics. Then I slipped the assembly through the door holes and tightened them on with a nut and washer combo. I tightened then enough so that the washer inside the handle bent into a U shape. They're locked in pretty solid. I don't think they're coming loose any time soon.

The end result is pretty sweet-looking, I think. The beauty of it is that if it ever starts coming loose, I can simply re-tighten the nut on the door and not worry about the screw head. It's pretty immobile. The only blemish is the open nodes on the handles. I intend to close these up at some point, otherwise the cavities will attract mud daubers, spiders and the like. I'll likely use an almond-colored silicone sealant, because in my experience with the tiki bar, basic wood putty cracks under stress. There may be a better option out there, and since I'm in no rush to finish off that portion of the build, I may well try something entirely different once all is said and done. But still, progress!

Now Playing: Dire Straits On the Night
Chicken Ranch Central

Thursday, June 01, 2017

The last Chicken Ranch book signing

This is it, Austin! The final, last, ultimate stop on my Inside the Texas Chicken Ranch signing tour. Hard to believe I've been doing this for almost an entire year now. So, if you've been on the fence about getting a signed copy, this is your last chance to catch me in the wild, so to speak.

I will be signing at Barnes & Noble Sunset Valley 1-3 p.m. Saturday, June 3. That's the Brodie Lane location, on the south side of Austin. Interestingly enough, this is the same location where I interviewed author Terry Brooks more than 15 years ago. Time flies, as they say.

While I will still do speaking engagements for the Chicken Ranch book, and hold out hope for Rob Ashford and Kristin Chenoweth to get their version of The Best Little Whorehouse in Texas produced on Broadway, this marks the last official publicity effort on my part for this book. It's been a wild ride and a learning experience for me. There are things I'd do differently, but overall I have to say that I've been greeted with great enthusiasm (almost) every place I've visited. There are still a few people here and there that think the Chicken Ranch's history isn't worth telling, but I generally ignore them. If you're in the neighborhood Saturday, come on out and keep me company!

Inside the Texas Chicken Ranch: The Definitive Account of the Best Little Whorehouse is now available from both Amazon.com and BarnesAndNoble.com. It's also available as an ebook in the following formats: Kindle, Nook, Google Play, iBooks and Kobo.

Now Playing: Lisa Ono Bossa Hula Nova
Chicken Ranch Central