Friday, May 26, 2017

Friday Night Videos

Friday Night Videos

I love the Electric Light Orchestra, Jeff Lynne's afro and all, but if Earth, Wind and Fire ever had their wardrobe stolen, I suspect I know where it ended up. See for yourself: "Livin' Thing".

Previously on Friday Night Videos... Billy Ocean.

Now Playing: Electric Light Orchestra Afterglow
Chicken Ranch Central

Wednesday, May 24, 2017

Tiki build-along, pt. 5

Tikifying my outdoor speakers isn't the only thing I've been up to. Progress on the back bar continues. Once I had the frame put together, it came time to waterproof it. I didn't use more durable, pressure-treated wood, because 1) the chemicals in such wood doesn't always interact nicely with metal, such as that found in nails, screws, fasteners, etc. and 2) the chemicals in such wood doesn't always interact nicely with human bodies (even though copper-based preservatives have largely replaced arsenic-based ones). Considering the fact that this would be a food preparation area, more or less, I wanted to go with something slightly less worry-inducing. In the end I went with Flood CWF-UV, not because it's food-safe (it isn't) but because I had some on hand. Budget-conscious, I am. But it's less threatening than arsenic/copper, so let's go with that.

Up and down, I coated the entire frame. The bar will be sheltered from direct exposure to the elements, but I don't want to have to worry about rot or mold. There's already a water spigot here, and I plan to make it a wet bar, so the potential for constant moisture and spills is not something to dismiss. The fact that the Flood is cedar-tinted made it easy to keep track of my progress--and see if I'd missed any spots.

Once I finished connecting all the legs, I realized that the pebble-concrete floor was not level. I didn't really want the wooden legs to stay in constant contact with the concrete because of the potential for wicking up moisture, but this clinched it. I needed to put leveling feet on the bar legs. Unfortunately, I couldn't find any of the heavy-duty all-metal ones I've seen in the past (just call me Mr. Over-engineering) so had to settle for some plastic anchor ones. You can see where I drilled out the hole to accept the footing anchor.

And here is the adjustable leveling foot inserted. I'm happy to report that the plastic anchor is holding up, and the leveling function is working properly. No unstable bar for me!

With the legs taken care of, it was time to tackle the bar top. If you'll recall from the start of this project, the size of the bar was determined by a 20" x 8' piece of plywood I had leftover. After coating it with the Flood weatherproofer, I positioned it atop the bar frame so that there was a 4" overhang on three sides, resting flush against the backing wall. I then used my drill--which I've had for close to 30 years and gets more use than any other power too I own--to make pilot holes and then fasten the plywood bar top to the frame with 2" outdoor wood screws.

And this is what it looks like. It's starting to be identifiable as a bar, no? I should add that somewhere along the line I attached the cabinet doors with hinges, screws and magnetic closures. They were all coated with Flood as well. I didn't take any photos of that, but I'll trust your imagination to fill in any gaps.

The plywood wasn't high-grade finish. I could have tried to sand it down and build it up to a smooth finish by applying many coats of polyurethane, but I did some of that with the initial tiki bar build last summer, and discovered it's a whole lot of work for minimal returns. That's why I went with laminate flooring for the bar top in that build. Following that route again had the added bonus of matching the back bar top to the tiki bar top, making the two look of a set, like I cleverly planned all this out from the start. Using the glue I had on hand, I spread Titebond III (the really, really strong stuff) along the corners and edges of the plywood surface, and filled in everywhere else with Titebond II (which is merely really strong). It's not my desire for the bar top to separate, you see.

Our entire house is floored in this crummy faux-pine hardwood laminate. Since I'm in the middle of my office build-along and replacing the floor (from whence the tiki bar top came) it was a straighforward matter to cannibalize more flooring from the office. I was able to pull up a section that was almost exactly 9'x4' which was plenty big to cut out a top for my back bar. A quick side note--one of the big reasons we hate this flooring so much (and we generally like laminate) is that it has very little texture and is very, very noisy. Not at all like the laminate we installed in our previous home. I've since discovered that this is actually a thing called "laminate tile" or somesuch, which is much thinner than traditional laminate flooring. It's also unpadded. Those factors combine to give it all the traits we dislike about it. But it makes for a decent bar top. I'll mix a drink on it, but I wouldn't want to walk on it. But it cuts easily enough with a jig saw, so that's what I did.

Then I used clamps and boards and random heavy things I had lying around to secure the laminate to the glue-coated surface of the plywood top. And squeezed it on real tight. The fit was just about perfect. I wiped up any oozing glue and left it secured that way for 24 hours.

And here it is without the clamps and assorted dead weight. The mini-fridge is about 21" deep, so once the trim is in place, everything should fit just about perfectly. It still doesn't look like much, I know, but I'm about to start prettying it up. It's going to look good--trust me on this.

Now Playing: Christopher Franke Babylon 5: Messages from Earth
Chicken Ranch Central

Monday, May 22, 2017

Tiki build-along, pt. 4

Okay, as a side effect of my tikification project, I had to remove the two outdoor speakers from the patio roof. Previously, I'd not given them much thought--they're out of the way and sound comes out of them when I turn on the stereo. What more is there? Well, getting them down was easy enough, but completely disgusting.

As you can see below, the previous owners of our house--they of the "Never met anything Tanglefoot wouldn't look good on" inclination--decided to smear Tanglefoot all over the tops of these speakers. In the decade or so since they went up, untold generations of insects, reptiles and possibly small mammals have met their demise atop these speakers, and since decomposed into a sticky, organic goo. Naturally, some of this vomit-inducing composition got on me during the speaker removal. I decided that crap had got to go.

Here's a close-up of some of the nastiness. This is what I have to deal with. Yuck. For some reason the previous owners seemed to think if you put Tanglefoot on something, critters would try to avoid it. Where they got this notion, I've no idea, but the opposite actually happens: A bug gets stuck, and that attracts a bigger bug looking for an easy meal. Which gets stuck as well. So then a gecko tries to eat them both. And gets stuck. And all of them die, which attracts more insects looking to feed on their rotting corpses... you get the idea. So I took them into the driveway and hosed them off with a jet nozzle to remove spider webs, mud dauber nest and assorted dirts before I tackled the Tanglefoot. The way to remove Tanglefoot is to scrub it using mineral spirits. It's not fun. It's labor intensive. But it works. Eventually I had two clean-ish speakers. The speakers were originally white, but they'd discolored over the years to a greyish-white, with some brownish discoloration in places. It would not clean off no matter how much detergent I scrubbed it with. Know what did come off? The plastic. Because of UV radiation degradation--even tucked away out of direct sunlight--the plastic casings had become brittle and crumbly. Clearly, I couldn't just put the speakers back up like before.

I disassembled the speakers, removing the mounting brackets and speaker cone cover. I got a couple cans of spray paint--one tan and one darker brown--and used masking tape to cover the speaker wire connections and the speaker cone. Then I sprayed each down with a couple coats of tan and let them sit in the garage overnight with the dehumidifier running.

I didn't have a lot of time to devote solely to the speakers (although, as these things do, I ended up spending a lot more time than planned) but since I'd gone this far, I wanted to make them fit in with the tikification happening on the patio. So I took masking tape, cut it into wedges, and masked out some patterns on the speaker.

Then I laid down a couple coats of brown over the speakers.

After 15-20 minutes or so, when the paint had dried to the touch but hadn't yet set, I used an Exacto knife to peel up the corner of the tape so I could remove it. Back in my model-kit making days, I learned that if you let the paint set up completely, it'd form a solid sheet and peeling up the tape would result in big chunks of the paint coming up from the painted surface as well. So removing the tape once the paint is not-quite-wet anymore prevents that from happening.

And the result is a series of light-colored wedges breaking up the heavy brown. It's nothing spectacular, I'll admit. It's vaguely tribal but more importantly, it was pretty simple. I toyed briefly with the idea of cladding the speakers in bamboo or reed, but that would get dirty very quickly and take forever to make and attach. This is much simpler and easier to keep clean.

The biggest challenge was what to do with the speaker covers. At first I thought I'd just go with solid color, but that evolved to thinking I should do tikiesque patterns, which evolved into making tiki faces. So that's what I did. Just like the speaker bodies, I painted the cover tan, then used masking tape to create the face pattern, followed by a coat of dark brown. This is the first face I attempted, and just between you and me, I think this one turned out the best. I just made it up as I went along, with no advanced design sketch or the like.

Here's tiki speaker No. 1 re-installed on the patio ceiling. He looks pretty good up there, no?

Here's tiki speaker No. 2 re-installed. It's a more complicated design but I don't think it's got the pop of the first one. Still, my eldest daughter thinks they're both cool. Regardless of their individual merits, they're a vast improvement over the Tanglefoot-goo speakers that previously hung there.

As a value-added bonus, I also replaced the defunct doorbell on the back patio. When we're outside, we can't hear the doorbell if we have visitors, so the previous owners (wisely) installed a doorbell extension on the patio. Over the years, however, barn swallows built nests on it and spiders built webs in it, with the end result being it died. So I replaced it, but the doorbell cover was--you guessed it--white. So I attempted the same tiki repurposing I did with the speakers. This one's interesting, but I think it ultimately looks more Native American in design than tiki. I'm sure it'll blend in when I have the wall decorations up, but from now on I think I'll sketch out my designs beforehand.

Now Playing: Esquivel Esquivel!
Chicken Ranch Central

Friday, May 19, 2017

Friday Night Videos

Friday Night Videos

The late Billy Ocean was big in the 80s. Really big. You wouldn't know that from the lack of airplay he gets these days, even on stuff like Sirius XM's 80s station. But he was. He had a smooth, soulful voice and stylish good looks. He seemed like a decent guy. I never quite liked his work enough to rush out and buy his albums, but I never changed the channel when they came on the radio. My earliest memory of him came from the video for "Loverboy". This was on heavy rotation on few video programs my MTV-free house received: Night Tracks, Friday Night Videos, etc. And you know what? It's even weirder today than I remember it. I have to wonder if the Henson Creature Shop was involved in this production in any way, because the horse-lizard main character has pretty sophisticated (though limited) facial movements that remind me of some Farscape creatures, and the woman he abducts looks like a Gelfling, or any of Brian Froud's other fairy-like creatures. Others online have noted the aesthetic similarities, but I haven't seen anything definitely connecting the two. The whole thing is a bizarre Star Wars cantina scene knock-off complete with fake Jawas, but the thing that stands out the most to me is the "Barbot." I want one of those.

Previously on Friday Night Videos... Tom Tom Club.

Now Playing: Sheena Easton Best Kept Secret
Chicken Ranch Central

Friday, May 12, 2017

Friday Night Videos

Friday Night Videos

Talking Heads, for all that group's brilliance, tended to put out surreal, weird music along with surreal, weird videos. I'm pretty much convinced that the Tom Tom Club's "Genius of Love"--a side project by Tina Weymouth and Chris Franz--exists solely to out-weird David Byrne. Frank Zappa reportedly loved this video, so that tells you all you need to know.

Previously on Friday Night Videos... The Cars.

Now Playing: Stan Getz The Complete Roost Recordings
Chicken Ranch Central

Thursday, May 11, 2017

Tiki build-along, pt. 3

Now is when things start getting serious. I received a couple of items in the mail these past two days that have me downright giddy, but I'm not ready to share them, yet. First things first.

Once I realized I was going all-in on the tikification of the back patio area, I knew some things had to change. The tiki bar was currently located in the center of the covered patio, in front of the stereo cabinet. At the time I built the bar, this was logical, but as the scope of the project expanded, problems cropped up. There are issues getting power to the refrigerator. The bar is not convenient to the pool during the summer. The bar tends to block off and isolate the far end of the patio, and lighting at night is poor. To solve this, I'd simply move the bar (which I built on rolling casters, so it can move fairly easily) close to the French doors for easy access to and from the house. I love my hand-built bar, but I started it before I'd explored the scope of what is possible with home bar projects. Namely, I wish I'd designed it as a wet bar, which is the main thing holding it back from perfection. There is a sink in the garage behind the single door, and as I pondered this problem, I thought "Hey, maybe I'll just clean that old work sink up and tikify it's little corner to use as the "wet" part of my bar. Then, gradually (I'm slow on the uptake sometimes) it dawned on me that I could tie into the water and drain of the sink and run pipes through the garage wall to have a light-use wet bar sink on the tiki patio itself. Brilliant!

I would build a back bar area along the wall to accommodate the pending sink. It would also house the refrigerator and offer more storage and counter space. At first, I thought I'd turn the entire length of that particular wall--from garage door to French doors--into the back bar area, but The Wife tapped the brakes on that idea. While my uber-bar would've been cool, from a logistics point of view it's probably for the best. I went back to the workbench plans to draw construction inspiration. To save money, on-hand materials greatly influenced my design. First up, the back-bar footprint and work surface. I just so happened to have a 20" x 8' plywood board already treated with weather sealant. It was leftover from either the original bar build or maybe the workbench--I can't recall which. Regardless, it was just about the perfect size for my needs. I placed it against the wall to get an idea for the back bar's footprint.

Next, I built a frame to support the bar surface out of 2"x4"s. Nothing fancy here. I measured to leave a 4" overhang on three sides, and screwed the pieces together after drilling the requisite pilot holes.

Next up, the legs. Unlike the workbench, I didn't use two 2"x4"s straddling the corners for legs. I just used one per corner because 1) the back bar didn't need to be as robust as the workbench, 2) I wanted to keep the front and back faces of the bench flat, to simplify my job, and 3) there would be more legs coming into play down the line, and I wanted to save wood. I only had one, twisted, 2"x4" on hand, so this is an area where I had to break down and buy new lumber.

I cut the legs to approximate the height of the workspace on my tiki bar. I allowed about an inch to compensate for the added bar surface and leg footers I'd planned, so at the moment it's a little bit short compared to the existing bar. I've written out the lengths and heights of the back bar and cuts I need to make, but I haven't gone so far as to draw up plans. I've got the vision in my head, though, so I'm not exactly winging it.

In the photo above and below you can see some of the parameters I'm working around. That's a propane line, left over from the house's original construction. Presumably it was used to fuel a gas grill when this was the edge of the patio. I suspect it has not been used since 2005, when the garage and patio were extended. There's also a water faucet and outdoor power outlet. My plan is to enclose and hide these while maintaining their accessibility/usability. Well, maybe not the propane outlet. But that limits my options somewhat.

For the interior structure, I used plates and brackets, drilling pilot holes and then fastening them in place with outdoor-rated wood screws. Initially on this juncture I used brackets on either side (you can see the screw holes on the side of the board). I had to remove the bracket and switch to a couple of plates when I realized the bracket would interfere with the closing of the cabinet doors. That's what I get for not planning everything out with formal blueprints.

Brackets worked just fine for the bottom frame, though.

The bar will have three cabinet doors. I'm using magnetic closures to secure them. Magnets always offer a nice, satisfying "click" when they connect with the door.

This is the skeletal form of the back bar. The open space is the refrigerator's new home. I deliberately made the space taller and wider than our current mini-fridge in case we want to upgrade in the future. We won't be able to upgrade a lot, mind you. The space is still fairly small. But it's nice to have options.

Here's the full view of the skeletal back bar. It's not quite symmetrical, but it looks so at a glance. The center area will be bar storage.

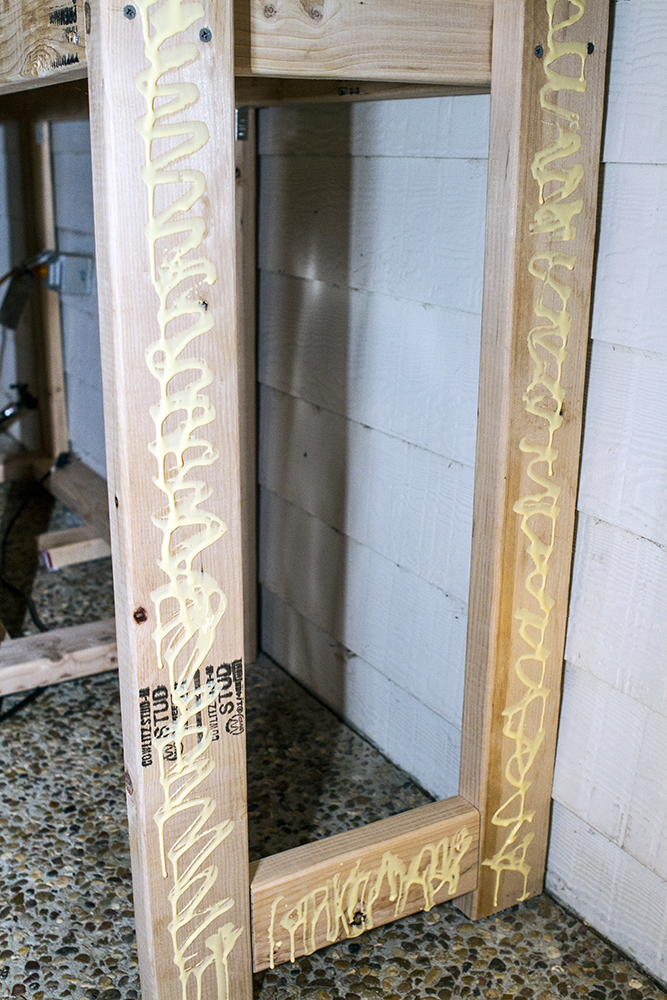
Next, I need to close in the sides of the bar. Rummaging through the garage I came up with some thin plywood scraps that would do the job. I coated them with weather protectant, because I don't want this all rotting away, right? Then I covered the sides of the exposed 2"x4" legs with Titebond II, a strong, waterproof wood glue.

I went with Titebond II instead of the stronger Titebond III because 1) Titebond III is about double the cost, and 2) I'm using roofing nails to doubly-secure the paneling in place. The nails, combined with the glue, leaves me pretty confident that paneling isn't going anywhere.

And here's the finished product. Well, not exactly finished. Not by a long shot. But this gives a glimpse of what shape the finished product will take.

Now Playing: Ray Charles The Genius After Hours
Chicken Ranch Central

Monday, May 08, 2017

Tiki build-along, pt. 2

I haven't posted much in the way of updates on my tiki build-along of late, but rest assured progress is being made. It's just tough to juggle everything when multiple projects are demanding my attention. My office build-along in particular. But I've been able to piggyback the two on occasion. For instance, remember when I applied polyurethane to all the shelves going into my office book case? I do, and I have the photos to prove it:

I can assure you, that was not a lot of fun. But I was able to include some tiki work while I was at it. The Wife's been picking up little tikiesque items here and there for a while now, and some look cool but are not designed to be exposed to the elements (we've watched several disintegrate in short order). To remedy this, I applied polyurethane to various bamboo and thatch items that we want to display outdoors. This tiki-hut-bird-house-cum-wind-chimes, for instance. It would last maybe 18 months to two years, tops, exposed to our sun and rain.

I like this coconut-bamboo wind chime guy even better. The polyurethane waterproofs it and will help it hold up longer outside. Unfortunately, polyurethane isn't resistant to UV radiation, and we've got that in spades during the summer. So later I went back and coated them with spar urethane, which is softer and less durable overall, but resists UV. Eventually, I hope to get some actual marine grade varnish, which is UV and water resistant in addition to being hard and durable, but it's not terribly common around here, so I make do.

Ah, now here's my favorite acquisition thus far. It's a Craig's List find I got from a person in Austin. I coated it several times to ensure its protection from the elements, because I plan on keeping this rack around a good long while. Isn't it cool? It's got brackets on the back to hang on a wall, and I expect that's what I'll eventually do with it. We have a wine safe in the house, so I won't be keeping wine bottles here--wine doesn't like the extreme temperature swings we get outside, anyway. Instead, I plan for this to become part of my rum library. It'll easily hold 10 or so bottles plus tiki mugs... not a bad start. Tiki cocktail culture is all about maintain a broad assortment of rums, so I've got to work my way up to that.

Now, admittedly, this doesn't show much actual build. I understand that. I have been building, though, and will show some of what I've accomplished in the next installment. It's a slower process than I'd like, but Rome wasn't built in a day, right?

Now Playing: The Beach Boys Still Cruisin'
Chicken Ranch Central

Friday, May 05, 2017

Friday Night Videos

Friday Night Videos

I just got a nostalgic urge to listen to The Cars, who've been off my radar for quite some time. Everyone knows their wacky videos from the Heartbeat City album, but their earlier video offerings were not quite so polished. Take, for example, "Since You're Gone," off their 1981 Shake It Up album. Endearingly awkward if probably the best way to describe it. And man, if Rick Ocasek isn't the goofiest looking rock star in history, he's at least in the top 10.

Previously on Friday Night Videos... Whitehorse.

Now Playing: Brian Wilson Imagination
Chicken Ranch Central