Remember how yesterday's
Tiki build-along installment was really short? Well, hold onto your mai tais, folks, because what follows is huge. Enormous. Long, even. With lots of photos.
Those playing along at home may recall certain references I've made to the bathroom porthole window on the patio. I started tearing it apart
here and you can catch glimpses of it
in situ here and in other posts if you're of a mind to look. When we first moved in, we thought it was kind of cool. But as I started tikifying the patio, that window grew dramatically less cool. The frame was made of four semi-circular pieces of wood that didn't join up very well. Worse, the wood and metal window edging had been coated with some kind of tough, textured paint/resin thing that hadn't aged well and accumulated dust. It had to go.

Here's the thing: A round window like that needs to enjoy a ship's porthole aesthetic. It just does, especially for a tiki bar, which naturally encompasses a certain nautical aesthetic. The problem, though, is that actual brass ships' portholes cost hundreds, if not thousands, of dollars. And this window is large--31" across, which is enormous for an actual porthole. So even if I could find one that would fit, 1) it'd be way too expensive for my budget, and 2) way too heavy for the wall. Crap. After spending the summer avoiding the issue, I finally broke down and admitted I'd have to try and fake one. I resisted this for a long time, because the
last thing I wanted was something that looked like a slab of plywood painted gold. Let me introduce you to what would become my personal hell for the next few months:
Certain of you think I know what I'm doing when it comes to woodworking. Hopefully, this will dissuade you from that notion forevermore. In my misguided way of thinking, I spent real money and bought the nicest 4'x4' sheet of oak plywood I could find. My thinking here is that oak, being hardwood, would be the best material for my shaping and sanding and tweaking into a fake brass porthole. Wrong. Apart from some kind of crappy sub-flooing plywood or particle board, oak was probably the worst choice I could've made. In addition to it being more expensive, oak is primarily valued for its dramatic, pronounced wood grain. Keep this in mind, it comes into play in a little bit.

I needed the plywood to be cut into a circle. How to do that? I knew better than to try and freehand it with a jig saw, but routers have an attachment that allows circular cuts. Those attachments are too small for my needs, but I figured I could rig something up. First, I marked the center of the 31" circle I needed on the plywood, then screwed an anchor screw right in the center.
The plywood was 3/4" thick, so I chose a narrow router bit and set it for a depth of about half the plywood's thickness. That way I'd make two passes and not stress the trim router's motor as much as I would by making one single, deep cut.
See? About halfway through the thickness of the board. All I can say is that it made sense at the time.
This is my super-high-tech circle-cutting jig: The short circle-cutting jig the router came with, and a length of garden wire. I'm using the trim router rather than my big Skil router because the big one, although probably better for this job, had no way to attach the jig to it.
And, here I go! There are three photos here of my routing out a circular cut because The Wife was kind enough to photograph me on this fool's errand. Her photos are always much nicer than mine, so I didn't want them to go to waste.
Here is the first cut. I then made a second pass to complete the cut.
Here is the second, inner cut. I managed this by the technical process of tying the wire shorter.
Look, folks! A wooden donut!
Alas, here's the first place the oak burned me. Being a hard wood, the router bit snagged and jumped repeatedly during my cuts. This resulted in gouges and ugly scratches and miscuts along the length of the circle. Remember how I wanted to make this look indistinguishable from an actual brass porthole? Crap like this doesn't help.
If there's one thing I've gotten good at, it's improvising solutions to cover up my screw-ups. In this case, repair involved copious amounts of wood putty. In this case, the repair worked out well--the putty sanded down very smooth once dried. Had I been smart (ha ha) I'd have glopped putty over the entirety of exposed wood surface. I'm not smart, and I didn't.
Now that I had the big wooden donut roughed out, I could start work on the center trim pieces. Drafting complaining children to help me, I held the 1"x6" center trim pieces of ponderosa pine in place and traced the intersection of the donut over them. Now I knew where to make the cuts so the trim would meet properly. Surprisingly, this part was relatively painless.
Cut marked on both trim pieces to accommodate big wooden donut.
Cut made!
Now, ever porthole needs rivets to complete the aesthetic, right? I marked the center of the donut at the four cardinal points, then four more at the halfway point between each. After some consideration, The Wife and I agreed that eight rivets did not sufficiently sell the illusion of portholyness, so I double the number to 16. Yikes!
I used a straightforward 1" drill bit to make the cuts.
The process was easy, but time-consuming. I had to get the hold deep enough for the wooden mushroom buttons I was using for rivets, but not so deep so as to cut all the way through.
I knew I'd screw this up, but somehow I didn't. You can also see the buttons below, after several coats of sanding sealer and several coats of metallic brass paint.
Way back at our old house I recalled using sanding sealer to get a nice, smooth polish on my bookshelves, so I chose to use sanding sealer on this oak to get a nice, smooth polish. Apply, let dry, sand lightly and repeat. Repeat about a hundred times over the ensuing month in a futile attempt to get a smooth, featureless surface that could pass for metal. This was the definition of tedium. Whilst that was going on, I also busied myself with the center trim pieces. I printed out and cut templates from cardstock so that it'd be durable enough to use multiple times. I traced these stencil patterns over the wood to guide me in my carving.
Unlike the base trim, which consisted of a repeating triangle pattern, I had this notion that since the center pieces were more visible, they needed a wider variety of designs. So I made way too many different patterns and used them all.
I wanted to add occasional tiki faces as well, but they were too complex to make an actual stencil template. So instead I sketched them out on a square of paper, then copied them freehand onto the wood. This might be a good place to mention that I can tend toward the obsessive at times. The Wife enjoys reminding me of this at every opportunity.
The tiki faces were too detailed to use the trim router on, so I spent a considerable amount of time carving them out with the Dremel. The Dremel got
lots of use. It's slow going, but can't be beat for detail work. Unfortunately, I had
lots of detail work. My ambitions outstrip common sense more often than not.
Once I finished carving everything out, I hit the boards with an angle grinder to add nicks and gouges to simulate the wear and tear of age, then pulled out the butane torch and scorched 'em all. Here's the result.
After that, I applied the wire brush to scrub off the carbonized wood (soot, if you will). Curiously enough, when I'm scrubbing, it smells of burnt marshmallows. I assume it's the wood sugars carmelizing under the heat. It's not unpleasant, but certainly weird.
At this point, after several weeks of work, I judged it was time to paint the big wooden donut. I judged wrong. A can of metallic brass spray paint only succeeded in showing me that oak grain is very, very durable stuff. It looked
exactly like a cheap piece of plywood painted brass in a misguided attempt to make it look like a ship's porthole. Even without the prominent grain, it still looked very plywood-ish. The Wife suggested beveling the edges of the big wood donut. I thought "What the hell?" It certainly couldn't hurt.
So I beveled the crap out of that big wooden donut. Fortunately, I already had the router bits I needed, so no additional expense was incurred.
I also took my power sander and sanded down the paint and sanding sealer and wood grain. I sanded and sanded and sanded some more. When the power sander started doing more harm than good, I hand sanded that sucker. Was I overdoing it? Maybe, but I didn't have many options left. Instead of the sanding sealer, this time I applied coats of water-based spar urethane. It wasn't as thick as oil-based spar urethane and so didn't build up as quickly, but it was thicker than the sanding sealer and dried fast allowing me to apply several coats in one evening.

Which brings us back to the metal window frame. The one with that resinous/texture/paint stuff on it. The stuff that didn't want to come off. I used sandpaper, utility knives, paint scrapers, razor blades and a host of other items to remove that crap from the metal. Even moreso than woodgrain, crappy paint texture painted brass would spoil the illusion I was trying to create. I worked on this for weeks. It was awkward to reach. The various curved angles presented a unique challenge. It wasn't until I started using a wet sanding sponge that I started making real progress.
This same sanding sponge, when dry, was fairly ineffective. But once I got it wet, it started stripping that crap away. Thank goodness.
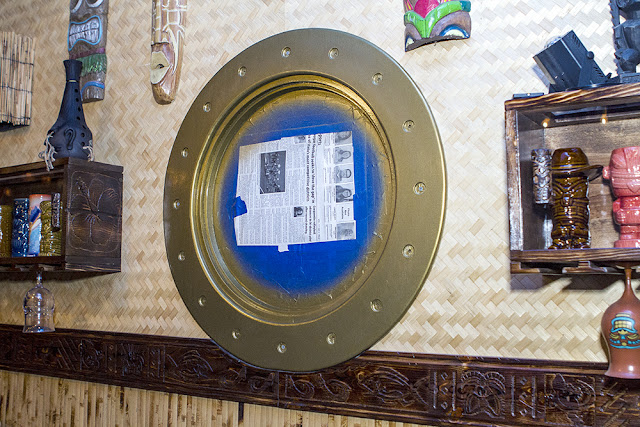
Somewhere along the line, I scraped all the white spray paint from the window. It was an ugly, half-assed privacy screen. Scrape, scrape, scrape. All gone. I wish everything else had been so easy. I used old newspaper and painter's tape to mask off the window glass in preparation for painting. I used a razor to trim the tape to form.
I ended up using more tape than I'd intended.
But what about overspray? Well, that called for more tape and lots of plastic sheeting. About this time a cold front blew through. The temperature didn't change much, but the damn wind whipped all that plastic around and pulled things apart repeatedly before I manage to get it all secured.
I kept an eye on the palm trees surrounding the pool. When they settled down, I got in a few seconds of spraying before the wind whipped them up again. Using this guerrilla approach, it only took me about three hours to apply a couple of coats to the metal window frame. The next day I added a coat of gloss enamel.
I used two cans of metallic brass spray paint to the big wooden donut. The good news: I succeeded in eradicating all traces of wood grain. The bad news: The spar urethane was showing brush strokes.
ARGH! Well, too late now. The brush strokes were visible up close, but not from a distance. It would have to do. And here's a little bit of cleverness--those circular holes for the rivets/buttons? The pilot point of the bit made for a perfect fit for screws. I held the big wooden donut in position, drilled a pilot hole into the fiber cement siding behind it, then secured it with long, outdoor screws.
I secured the big wooden donut to the wall with screws at the cardinal points. Suddenly, it's not looking quite so much like a big wooden donut anymore.
Remove the tape and newspaper, and add the mushroom buttons, if you squint just right, it kinda sorta looks a little like a brass porthole. I must confess this final step was not so easy. Turns out the paint and spar urethane added just enough thickness to the edges of the holes that the mushroom buttons would not fit. At all. So I had to break out the 1" drill bit once more and clean them out, once by one. Shavings of paint and urethane rained down like snow. Which was a mess to clean up. To get the mushroom buttons in place, I set them in their respective holes, placed a sheet of wax paper over each, placed a leather belt over that, then gave it a couple solid whacks with a wooden carving mallet. This elaborate dance was designed to avoid marring the paint on the buttons. Believe it or not, those were the only things that seem to have turned out flawlessly.


And here is a shot of the finished product for comparison with the initial image in this post above. It doesn't look bad from this angle, but then again, I know all the flaws and I'm certain they will trouble me the rest of my life. Still, I guess compared to dropping a couple of thousand on a for-real brass porthole, it's a bargain at twice the price.
Now Playing: Carlos Lyra Bossa Nova
Chicken Ranch Central