My first professionally-published piece of fiction, "Project Timespan," appeared in Interzone No. 116 in February of 1997.
Today, March 31, 2017, I received my first royalty check. Ever. Not first royalty statement--I've gotten plenty of those over the years. This is my first check. And no, I'm not about to retire off of it.
Let that sink in for a moment. I'll let you do the math.
I'm not Robert Silverberg-level productive by any stretch of the imagination, but I've published enough in my modest career to have escaped the one-and-done category. Occasionally, a random stranger will recognize my name. Some publications have been obscure, others have been fairly high profile. Fiction, non-fiction, reviews, essays, etc. I've not exactly pigeon-holed myself. A bit of my work's been reprinted. I received a reprint inquiry for one of my author interviews yesterday, in fact. Out of all of that, I've never earned a royalty check.
If anyone wonders why I've never made the jump to full-time freelance writer, that probably has something to do with it.
Now Playing: Aaron Copland Billy the Kid - Rodeo
Chicken Ranch Central

Friday, March 31, 2017
Tuesday, March 28, 2017
Pine trees, with occasional grapes
So, remember those grape cuttings I got a while back? I'm happy to report that after almost a month in pots, I'm getting healthy growth from the majority. The Valhallah grapes are even trying to set flowers this year, see?
 That's kind of nuts for a cutting that's just barely rooted, but the cutting doesn't know that. I'll pinch the flower bunches off soon, so it puts more of its energy into producing roots and vegetation. Next year I'll let it make some grapes so I can judge their quality. Valhallah is by far the most precocious of the cuttings I've received, and the easiest to root as well. The next-most vigorous is Elvicand, which makes sense, since Valhallah is a hybrid with Elvicand in its ancestry. After that, we get Ben Hur, which is pushing out buds but not growing anywhere near the rate of the first two. I'm curious about Ben Hur, as T.V. Munson, the breeder who created the type back in the late 1800s, described it as similar to Black Spanish (aka Lenoir) in most respects for use in winemaking, but had far higher disease resistance. The one that's disappointed thus far is Wapanuka, a white table grape type. It's not sprouted. Its buds aren't even swelling. Of the four varieties, only it showed little sign of callusing before I potted it up. Fortunately, the cuttings haven't taken on that sickly gray color of dead wood. It's still brown, with thin strips of papery bark peeling away. I'll wait a few weeks before slicing into the bark to see if there's still green tissue underneath, but at this point I don't know if it'll root or not. Patience is going to be my companion on this one.
 My big effort this weekend involved planting a pine forest. It's not actually a forest, but I can pretend, can't I? See, pine trees don't grow well here on the edge of the Hill Country. The soil is to alkaline. But I ordered 25 piñon pine seedlings from West Texas Nursery, and they came in a few weeks ago. These grow out in West Texas where what little soil there is is alkaline and rain is sparse. Comal County is at the easternmost edge of its listed growing range, so they may or may not survive for me. I initially wanted the Texas piñon (aka Remote Piñon pine) but they're rare in the nursery trade. This is the closely-related species, Pinus edulis, which isn't as good a match for my area, but we'll see what happens.
The reason I did not plant them right away is because the space in the back corner of our yard where they were to go had been overrun with more of that damn Carolina jasmine. I spent Saturday attacking the overgrown mass with pruning shears, a hedge trimmer and chainsaw. This is what I cleared out:
My big effort this weekend involved planting a pine forest. It's not actually a forest, but I can pretend, can't I? See, pine trees don't grow well here on the edge of the Hill Country. The soil is to alkaline. But I ordered 25 piñon pine seedlings from West Texas Nursery, and they came in a few weeks ago. These grow out in West Texas where what little soil there is is alkaline and rain is sparse. Comal County is at the easternmost edge of its listed growing range, so they may or may not survive for me. I initially wanted the Texas piñon (aka Remote Piñon pine) but they're rare in the nursery trade. This is the closely-related species, Pinus edulis, which isn't as good a match for my area, but we'll see what happens.
The reason I did not plant them right away is because the space in the back corner of our yard where they were to go had been overrun with more of that damn Carolina jasmine. I spent Saturday attacking the overgrown mass with pruning shears, a hedge trimmer and chainsaw. This is what I cleared out:
 In the landscaped areas in the backyard, the previous owners thought that covering the ground with stone would be a good idea. It's whitish stuff, marble or limestone maybe, and a huge pain in the ass. It doesn't suppress weed or grass growth at all, does little to retain moisture and is difficult to dig through or move around. To make matters worse, at some point they decided new landscape fabric was necessary to control weeds, so instead of pulling up the old stuff they simply laid a new layer on top--with about six inches of soil between the two. Talk about headache-inducing! In this section, though, it appears there is only one layer of landscape fabric (probably because of that monstrous jasmine). I used the trusty hoe to move the rocks and accumulated dirt/roots/mulch to expose the fabric.
 Then I used my utility knife to slice a hole maybe a foot across in the fabric, and a sharpshooter shovel to finish the hole.
 Here's where it gets interesting. The seedling pines arrived in conical planting containers. I've never seen anything like this before. The trees are not terribly easy to extract from these, especially without damaging the roots.
 But the roots! Oh, my, they are packed in tightly! Some are even potentially girdling the young tree. This will never do.
 Although the planting instructions on the West Texas Nursery site seem to recommend planting as-is, I felt it prudent to separate the roots. These were so small I just used my fingers to break up the soil and knotted roots, and after a short bit had a nice, frizzy cluster of roots.
 Everything after that was pretty straightforward. I planted the seedlings in the holes then refilled with soil. In some instances large rocks came out of the hole, so there wasn't enough soil to go back in, in which case I filled a bucket with alluvial soil/clay from the drainage out front and used that to supplement the hole. Afterwards, I replaced the landscape fabric, covered with stone and mulch, then watered each tree with a gallon or so of water.
 All in all, I planted 10 trees here, roughly 2.5-3 feet apart. This is closer than the recommended spacing, but I expect a fairly high mortality rate. In any event, it'll be years before they're big enough to worry about crowding, and even then they're relatively small trees. If I'm lucky, by then they'll be producing edible nuts. I've still got 15 seedlings left, and I plan to put some out in the front yard and pot up others to hold in reserve as insurance in case I have a big die off. The pine forest might not look like much now, but give it 10 years and you might even be able to tell there are trees planted there.
 Now Playing: Stan Getz The Complete Roost Recordings
Chicken Ranch Central


Chicken Ranch Central
Friday, March 24, 2017
Sailing Venus: Of writer groups and turning points

Erica recoiled, stumbling back. She had to get away. She couldn't let them find her here, watching this. Watching whatever came next. She fled. What came next? She shoved it from her mind. She didn't want to know. She already knew. She should turn around. Confront them. Stop this... betrayal? Was this what betrayal felt like? Then why did she feel so guilty? Erica stopped, blinking in confusion. Where was she? The hangar. How had she gotten here? She couldn't remember. Why couldn't she remember? The airlock leading to Wind Sprite lay open before her. Beckoning her. Only Wind Sprite guaranteed solitude. She was safe aboard Wind Sprite. Nobody could hurt her there.Honestly, I feel sorry for Erica. She's about to make some very bad decisions, and suffer the consequences. Hopefully, once I'm finished, readers will feel that same empathy. After all, isn't that what writers strive for? Now Playing: Dr. Jeffrey Thompson Voyager Space Sounds
Chicken Ranch Central
Friday Night Videos

Chicken Ranch Central
Friday, March 17, 2017
Friday Night Videos
Chicken Ranch Central
Wednesday, March 15, 2017
The Chicken Ranch does San Antonio!


Chicken Ranch Central
Tuesday, March 14, 2017
Tiki build-along
Anyone who's been following here in recent months will notice I've been trending tiki for a while now. I'm a little late to the tiki revival, but I come by it honestly. We moved into the new house a little more than two years ago, and we really lucked out to get a place with 1) a swimming pool, 2) a covered patio built for entertaining, and 3) tropical landscaping around the pool. I spent the first year here building The Wife a photography studio. That took some serious effort, since the majority was DIY. Last year was consumed to great extent by my book's publication, plus my office-build-along. Early in the summer, though, The Wife came home with some silly light-up tiki statues, and on our vacation we picked up some additional tiki masks in Key West. At that point I said to her, "I'm going to build a tiki bar."
Mind you, at that point I was unaware of the larger tiki revival going on. As far as I knew, tiki culture was something from the 50s and 60s that had long since vanished. So I set about building my own tiki bar armed only with my own undaunted ignorance. I didn't know what I wanted, but I knew what I didn't want. Eventually, I settled on these plans for a 6-foot bar as my template. Note that these plans are for a more upscale bar than a tiki bar would normally qualify for. So I made some adjustments of my own. I extended the right side to make it a wrap-around. The drawers were radically simplified, and the wine racks do not pull out. For lumber, I used pine plywood rather than oak or similarly expensive hardwood. I coated all the wood with UV/water resistant stain (cedar color) before applying several coats of polyurethane, which I then topped with several coats of spar urethane. From the beginning, I knew I wanted to have palm thatch wrapping around the bar. We have a dozen or so palm trees around the house, so there will never be a shortage of palm fronds if any need replacing. The bar top is laminate flooring pulled up from my office, as are the drawer fronts. When I get some more long pieces, I'll probably use more of the laminate for the backing on the inside of bar. The moso bamboo culms edging the bar top came from Bamboo Branch in Austin. I also built it on casters, so it can be easily moved. It made its debut at my book release party and attendees seemed to get a kick out of it. Overall, I'm pretty happy with the way it turned out.


 In hindsight, there are some things I'd do differently. The bottom shelf initially didn't extend the entire way across the bottom, because I had some notion the bar refrigerator would go there. Well, that proved completely unworkable, so I retrofitted an extended shelf there. Not terribly pretty, but it works. It's also not a full wet bar--no running water--so there are limits on its functionality. Looking at all the incredibly inventive home tiki bars out there (now that I know what to look for) I'm struck with all kinds of ways I could improve it.
And so begins the grand tiki adventure. I have a tiki bar. I now need a full-blown tiki lounge space. Our covered patio area is 64' long by 10' wide. That's a lot of room to spread out. And we have plans, oh yes. Below is the view from the bar, looking out to the pool.
In hindsight, there are some things I'd do differently. The bottom shelf initially didn't extend the entire way across the bottom, because I had some notion the bar refrigerator would go there. Well, that proved completely unworkable, so I retrofitted an extended shelf there. Not terribly pretty, but it works. It's also not a full wet bar--no running water--so there are limits on its functionality. Looking at all the incredibly inventive home tiki bars out there (now that I know what to look for) I'm struck with all kinds of ways I could improve it.
And so begins the grand tiki adventure. I have a tiki bar. I now need a full-blown tiki lounge space. Our covered patio area is 64' long by 10' wide. That's a lot of room to spread out. And we have plans, oh yes. Below is the view from the bar, looking out to the pool.
 This view is from the waterfall, looking back to the corner of the patio. The cabana umbrella is synthetic for now, and not terribly convincing, but a real thatch one lies in our future.
 From the waterfall, looking back at the bar. I initially placed the bar here, because the outdoor stereo/CD player is behind those cabinet doors. It seemed a natural spot, but the more I think about it, I'm becoming convinced the bar should switch places with the dark wicker furniture to the right. There are electric plugs there, so I wouldn't have to run long extension cords for the fridge, plus there's a sink in the garage, right behind the wall next to that solid door. It would be relatively straightforward to build a back bar in that area with a sink, making it a full wet bar.
 Because I'm a completist, here's the view from the house looking back the opposite way. I'm in the process of constructing a garden shed off in the yard, so the lawn mower and wood chipper currently parked on the far end will have a different home in another week or so. All in all, quite a bit of potential. The only thing holding me back now, apart from hours in the day, is money in the bank account. I could easily blow a lot of cash on this, but as with everything we undertake, it will be on a budget.
 Case in point, the sconce lights on the wall. It's a western star motif. Pretty much every light fixture in the house is along this design aesthetic, which is all fine and dandy, but it's just not us. And the house isn't really rustic enough to carry it, you know? Since we moved in we've talked about changing them out, and on the back patio they really clashed with the tiki vibe. Looking online, however, I quickly learned there was not much commercially available that could pass as tikiesque, and what little there was cost way beyond what my budget could shoulder.
 Here's a closer view of one dismounted from the wall. Not terribly tiki, is it?
 To make matters worse, the previous owners had an unhealthy obsession with Tanglefoot. If you're unfamiliar with it, this is a very, very sticky substance used to ring the trunks of trees to keep leafcutter ants from climbing the trunk, things like that. For some reason, they seemed to think the stickiness acted as a repellent, that if they slathered the stuff on things they didn't want insects, reptiles, spiders, etc. on, it would keep them away. They slathered that stuff on all the outdoor speakers, the patio columns and worst of all, the tops of the wall sconces. Until I took a closer look, I'd assumed the tops were opaque. Not even close. So many dead bugs, spiders, geckos, dust, dirt, twigs and unidentifiable gunk had built up over the past decade that it completely blocked out the light from the bulb below. I can assure you, it's nasty. And every light had this mess slathered over the top of it. You should see the outside speakers.
 Fortunately, Tanglefoot cleans up with mineral spirits. That's not to say it cleans up easily. It doesn't. But after far too much time and effort, this is the result. Quite dramatic, no?
 Now the sconces are clean, but not any more tiki than before. What to do? For that, I turn to the tikiphile's answer to duct tape--reed fencing, commonly available in garden centers and home improvement stores nationwide. The sconces are roughly 10" high, so I cut sections of the reed fencing 12" wide and long enough to wrap around three sides of the sconce, twice. Turns out the fencing isn't terribly tight, so the western star is painfully obvious with a single layer. Two layers, though, that works nicely. The wire ties are loose, though, so the reeds slip out easily. Too keep it held together, I applied a flexible glue to the wire ties. Also, I slathered the reeds in spar urethane to protect them from UV and moisture. They'll be protected from the elements under the patio overhang, but reed's not the most durable substance on Earth, you know? I figure a little insurance wouldn't hurt.
 Next, I took thin, black craft wire and looped it around the reeds.
 The sconce had a perforated hole pattern above and below the star. This turned out to be perfectly situated to thread the wire through to anchor the reed.
 Once I got both ends of the wire through the holes (which sounds simple enough, but in practice was maddening) I simply tied them off.
 Voila! Instant tiki wall sconce. Most of these are on a dimmer switch, which makes it all the better--I can turn them down when necessary to get that coveted, dimly-lit tiki atmosphere.
 Updates on this project will be few and far between, but I've got some grand plans and hopefully I'll be able to pull off a few as we get deeper into spring.
Now Playing: Billy Joel 52nd Street
Updates on this project will be few and far between, but I've got some grand plans and hopefully I'll be able to pull off a few as we get deeper into spring.
Now Playing: Billy Joel 52nd Street
Chicken Ranch Central


Chicken Ranch Central
Monday, March 13, 2017
Office build-along, pt. 11
In my last update, I showed how I'd finally gotten the far corner upright into position, along with the end cabinet and laid down some pretty heavy-duty vapor barrier. I finished up by showing the big stack of shelving I'd cut. If you keep in mind the fact that these reports aren't going up real time, it will be easier to take in the fact that staining and varnishing all those shelves took a very, very long time to complete. We're talking a month to six weeks. The problem comes back to weather--often it was too humid or too cold to apply the various stains and polyurethanes, particularly at night, when I was most likely to have time to work on them. On the staining, I didn't cut corners and go with only one coat of Minwax's "Special Walnut," although I was sorely tempted to on occasion. No, I stained everything, let dry for a day then flipped the shelves over and stained the underside. Once that was dry, I broke out the "Dark Walnut" and repeated the process. In case you're wondering, "Dark Walnut" still is akin to painting with molasses. It's just so thick and gummy in comparison to other stains. Ugh. It slowed the process down a lot.
Once the staining was done, then came the polyurethane. Here's I cheated. The cheap radiata pine plywood I'm using is only sanded smooth on one side, with the other being fairly rough. The smooth side will be the top of the shelf, and the rough side the bottom. For the bottom, I'm only applying one coat of polyurethane, and not sanding. I feel a little guilty about this, because it's not completely professional, but I don't know of anyone who is going to feel the undersides of my shelves and criticize me for it. It may be more prone to dust collecting, but that's something I'll have to live with. As for the top sides, I applied two coats of polyurethane, sanding in between. In an ideal world, I'd have applied a third coat, since polyurethane doesn't build up as thickly or smoothly as sanding sealer, but I'd like to finish this before I retire, so two coats it is.
One final note--because the plywood was inexpensive, it did not come without blemishes. The thin surface veneer on the smooth side was cracked and warping in a handful of places. This resulted in 4-5 shelves (including one of the diamond-shaped corner pieces) with notable surface defects. They're not smooth. Flipping the board upside down was out of the question unless I wanted to spend hours sanding down that rough surface and re-varnishing (which I didn't), so I made an executive decision to use the ugly boards for the top shelves, which are about 8 feet up and unlikely to suffer close examination. So, yeah, I'm hiding my mistakes.
 And speaking of mistakes, the one thing that bothered me the most about my old office bookshelves, and still nags me to this day, is the fact that I didn't build a "top" into it. That is, the white ceiling could be seen when looking up at the top of the shelves. It's a little thing, maybe, but jarring to me. In the photo above, you can see what I'm talking about. That little white sliver between the books and crown molding might as well be a flashing beacon as far as I'm concerned. With this new bookcase, I would not make the same mistake twice.
 So this is what I did. I went back to the area lumber yards and found the thinnest, cheapest plywood sheet I could find. What I came up with was something called "Utility Panel" that cost me $9. Keep in mind that hardwoods--oak, etc.--are considered the beauty woods, while softwoods--evergreens like pine, etc.--are not pretty and considered suitable for structure use. Probably 95 percent of my bookcase is pine or other softwood (which doesn't necessarily mean it's soft, that's just a broad classification), so I'm spending significant effort to make it look nice. This utility panel stuff isn't something you'd want front and center, but for my use it is going to go mostly unnoticed, and that's just fine.
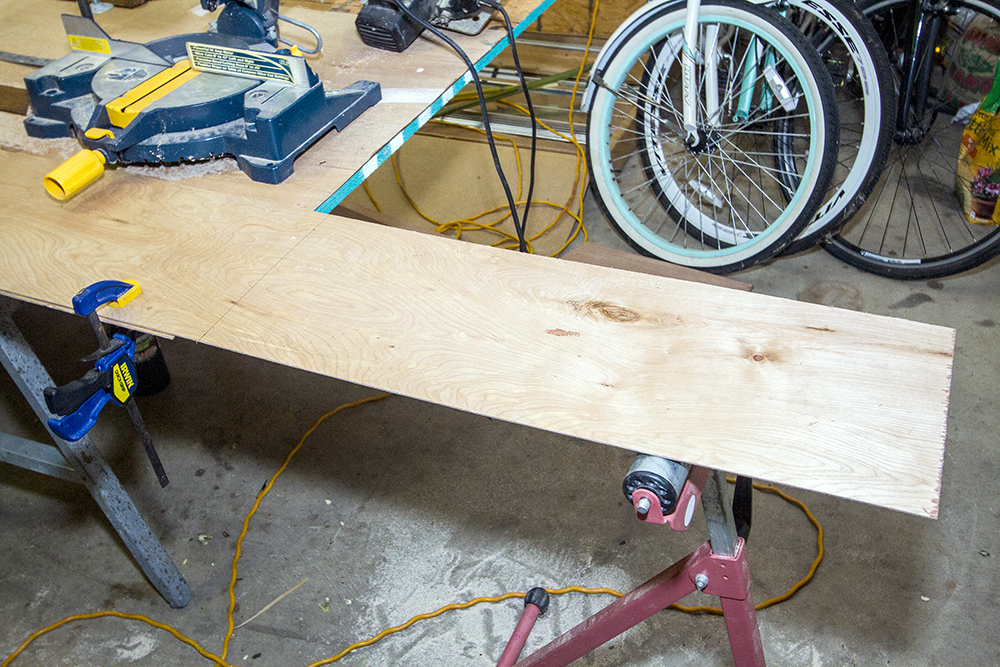
First off, imagine I walked you through the whole staining process on one side of this utility panel. Just one coat, "Special Walnut," like I applied to the lauan paneling for the back of the case. Fortunately, the stain comes out pretty dark on this wood, which is what I want. Next, imagine I documented using my circle saw to cut an 11" wide strip down the length of the panel. Got it? Great, you're caught up then. I measured the distance between the shelving uprights where they meet the ceiling, and that comes out to roughly 29.5". So I mark 29.5" on the 11" wide strip, above, then cut with the circle saw, below.
So this is what I did. I went back to the area lumber yards and found the thinnest, cheapest plywood sheet I could find. What I came up with was something called "Utility Panel" that cost me $9. Keep in mind that hardwoods--oak, etc.--are considered the beauty woods, while softwoods--evergreens like pine, etc.--are not pretty and considered suitable for structure use. Probably 95 percent of my bookcase is pine or other softwood (which doesn't necessarily mean it's soft, that's just a broad classification), so I'm spending significant effort to make it look nice. This utility panel stuff isn't something you'd want front and center, but for my use it is going to go mostly unnoticed, and that's just fine.
First off, imagine I walked you through the whole staining process on one side of this utility panel. Just one coat, "Special Walnut," like I applied to the lauan paneling for the back of the case. Fortunately, the stain comes out pretty dark on this wood, which is what I want. Next, imagine I documented using my circle saw to cut an 11" wide strip down the length of the panel. Got it? Great, you're caught up then. I measured the distance between the shelving uprights where they meet the ceiling, and that comes out to roughly 29.5". So I mark 29.5" on the 11" wide strip, above, then cut with the circle saw, below.
 Now, remember that 2x4 I sliced up into triangular sections a while back? Imagine I stained them and varnished the widest face on each. Now, since they're all clean and pretty, I cut a couple of 29.5" pieces from them.
 Now, I pair those triangles up with the stained utility panel section. See what I'm doing with them?
 Before I install the pieces, I need to mark where the wall studs are. Remember, I've been using wall and ceiling marks, but these are about to be covered up. I use blue painter's tape for this purpose, mainly because that's the first thing I found.
 Next, whilst holding the ceiling panel and triangle brace in place, I drill two pilot holes through the brace into the wall stud. Then I used a larger bit to give the screws a shallow depression to countersink into. Then I screw in the screws. That sounds pretty straightforward, but it a bit more challenging when you have to change the drill bits one-handed, since the other hand is holding the wood in place. I'm sure there's a simpler way to do this, but I've never claimed to be the sharpest nail in the box when it comes to carpentry. I also drilled a pilot hole through the upright to the right, and ran a long, 3" screw through it into the triangular brace. Repeat as necessary.
 Once the back brace is in place, I attach the front brace to the uprights. Same drill applies, first the pilot holes, then a countersink hole, then I put the screw in. Despite my efforts, I split the wood on three of my first four efforts. It's not pretty, but this will be covered by crown molding eventually. Holding the ceiling piece up is its primary job--structural bracing is minimal, mostly just to ensure the uprights are parallel until I can get the shelves in.
 Those screw holes are pretty unsightly, so I fill them with wood putty. Once they're dry, I hit 'em with a splash of "Dark Walnut" and they're not nearly as noticeable. Yes, I've learned my lesson with "Dark Walnut." It's good for these little details but you have to wipe up the excess immediately.
 So, with the uprights in place, the time came to install the shelves. The 9" wide end shelves were a little tight in some cases, but a few whacks with the rubber mallet got them in place nicely. The next column of 30" wide shelves slid into the routered dados just as pretty as you please. The next column? No so much. Back when I routered the base of the uprights to make everything fit, well, this middle column of shelves gave up more space than the rest, and came out almost exactly half an inch narrower than any of the other columns. So after testing the proper length to fit on a piece of scrap lumber, I ran five shelves across my table saw to trim off that extra half inch. The result was a perfect fit, and a few whacks with the rubber mallet got the top shelf in, correcting a slight bit of warp in the right upright. The final column of shelves went in nicely, the result being one wall that is finally starting to look like bookshelves.
 Now Playing: Billy Joel An Innocent Man
Chicken Ranch Central


Chicken Ranch Central
Friday, March 10, 2017
Friday Night Videos
Chicken Ranch Central
Monday, March 06, 2017
Grapes alive!
Back in February I wrote about how I'd gotten a shipment of grape cuttings in from the T.V. Munson vineyard at Grayson College. These hybrid varieties were created by Munson more than a century ago to 1) resist the various disease pressures of Texas and the Southern United States and 2) thrive in our soil and climactic conditions, which cause many common grape varieties considerable trouble. What I got from Grayson amounted to a bunch of 12" sticks cut from their mature vines. To prepare them for planting, I dipped each in Dip 'n Grow liquid rooting hormone, then bundled them up in a trash bag filled with moist sphagnum moss, then wrapped that in a black, light-proof bag and set it in my cloning box atop a plant heating mat. The damp heat encourages the cuttings to callus, which is the first stage of rooting, and the dark environment discourages the cuttings from sprouting prematurely. This is what they looked like when I pulled them out:
 Let's quickly go over the four different cultivars I'm trying to root:
 And when we're talking about calluses, it's difficult to visualize. Essentially, from what I can gather, it's scar tissue that closes up the bottom cut on the budwood, from which roots develop. It's creamy in color, and can form beneath the bark as well as atop of it. Here are two pieces of Valhallah that the calluses are quite clear. Calluses are easily obscured by bark and the sphagnum moss--these weren't very visible until I washed them off.
 And here's Elvicand. The calluses are obscured by sphagnum moss, but there's no mistaking that aggressive root growth. Elvicand was a popular wine grape pre-Prohibition, in no small part, I suspect, to the ease in which it roots.
 So here they all are, potted up and ready (hopefully) to take root and grow vigorously for a few months, at which point I'll transplant to separate containers. Of the four types I'm working with, Elvicand seems the most easily rooted, with calluses and aggressive roots. Valhallah is next, with small roots forming on several pieces of wood, but all showing some degree of callusing. After that comes Ben Hur, with aggressive sprouting but only minimal callusing and no visible roots. Finally we have Wapanuka, with no sprouts, no roots and no obvious callusing. The wood still appears healthy and alive, so I'll exercise patience and keep a close eye on it for the next few months. Grape cuttings can live for months without developing roots as long as they've kept moist, and I wonder if the rarity of Wapanuka stems from a reluctance to root.
 In other news, I got in a shipment of 25 piñon pine seedings in from West Texas Nursery. Alas, I wasn't paying as close attention as I should have--turns out these are pinus edulis as opposed to pinus remota, which is what I really wanted and think would do better here on the edge of the Hill Country. Regardless, they're both closely related pine trees that require alkaline soil to grow, and produce edible pine nuts. I intend to plant a number of them and hope for the best, while trading the rest for other interesting plant types. Wish me luck!
 Now Playing: Wyndnwyre Wyndnwyre
Chicken Ranch Central

BEN HUR. Parentage a combination of Post Oak grape with Norton and Herbemont. Vine very vigorous, very prolific, free from rot and mildew; cluster large; berry little under medially black, persistent; pulp very tender, juicy, sprightly, sweet. We consider this one of the most valuable of American wine grapes. Those who like Le Noir grape will like this, as it has all the good qualities of Le Noir without its tendency to rot or mildew. Medium to long arm pruning, Ten feet apart. Ripens in August 5th to 15th, at Denison, Texas. [I've been considering Black Spanish/Lenoir grapes for our place, but this selection seems to offer all the advantages without the drawbacks of that better-known type. Easy call] ELVICAND. 1885. (Elvira x Mustang). This is the best of three accidental hybrids of Elvira with the native Mustang grape, illustrates how readily hybrids between cultivated and wild grapes occur. There is no mistaking that the variety shows Mustang much more than Elvira. A pure natural compromise of three very distinct species, — one from the far Northeast, Labrusca, one from the cold North, Vulpina, and one from the hot Southwest, Candicans; vine vigorous with rampant growth, leaves of medium size, leathery, dark green above, covered with dense white woolly felt on under side and on younger wood; cluster small, compact, shouldered, peduncle short; berry globular, clear translucent red, above medium size, very persistent, the pedicel extracting a small core, when berry is pulled off, as in Mustang pulp tender, juicy, of a very sprightly sweet, slight Mustang flavor. Vine bears heavily with long arm pruning. Colors at mid-season but should hang several weeks to reach its best quality. Birds do not bother it until quite ripe. Ellis variety has received very favorable notice in South Texas and in California, as making a peculiar, very agreeable light white wine. The fruit neither rots or cracks, and the foliage never mildews. Here is a base on which to build a distinct very successful class of high colored grapes for all the country south of Mason and Dixon’s line. [My late father-in-law had what we thought were sweet, low-acid mustang grapes growing on his property outside of Bastrop. They were quite wonderful in flavor. I'm willing to bet now that they were Elvicand types gone feral from an old homestead]. VALHALLAH. 1893. (Elvicand x Brilliant). Vine strong grower, foliage much more resembling Brilliant than Elvicand, and a little subject to mildew in wet seasons. Cluster small to medium, shouldered; berries large, dark, translucent red, globular, persistent, skin tough, pulp tender, juicy, of very good quality, — an improvement on Elvicand; has a trace of Mustang pulp flavor, but none of the twang of skin; ripe a little later than Concord and hangs sound a long time. Adapted to same range as Elvicand, and especially suitable for very limy soil. Plant 10 feet apart, give long arm pruning. Perfect flower. [This is what put me on the hunt for Munson's varieties--looking for a table grape suited for Central Texas conditions. It is reported to have flourished in trials in San Antonio. Who am I to argue with that?] WAPANUKA. 1893. (Rommel x Brilliant). Growth medium to strong, equal with Concord, less attacked by mildew than Brilliant. Cluster medium to large, cylindrical, shouldered, properly compact; peduncle short to medium. Berries large, five-eights to seven-eights inch in diameter, globular, persistent, rich yellowish-white, translucent; skin very thin and delicate, yet seldom cracks, and handles better than Rommel. Ripe about with Delaware. Far superior to Niagara and Green Mountain. For nearby market and table grape there is no other variety superior, if equal, to it. Very prolific, requires short pruning. Succeeds well North and South. Reported as enduring drought in Western Texas among the best. Undoubtedly one of the best, if not the best, table and eating grapes produced in the United States. Takes the place of the Rommel, it being superior to it, although the Rommel is near the top for extra fine quality and flavor. Plant 8 Feet. Short arm pruning. Perfect flower. [The table grape description caught my attention. I'd never heard of this grape, and it seems pretty obscure, even for a Munson type. I wonder why it's not more widely grown, as opposed to, say, the Chanpanel, which is the one Munson variety readily available but isn't considered good for eating and only marginal for wine.]As you can see in the image below, wrapping in a black bag wasn't enough to keep some of the cuttings from sprouting. This is Ben Hur, I believe.


Chicken Ranch Central
Friday, March 03, 2017
Friday Night Videos
Chicken Ranch Central
Subscribe to:
Posts (Atom)