I've made no secret that the hardest thing for me about selling our old house (apart from the memories left behind) was parting with my office. I built floor-to-ceiling bookshelves in there, my small approximation of the spectacular formal libraries one always saw in those Agatha Christie-style whodunit films from decades past. I began it about two years after we'd moved in, in
May of 2005 and finished it in
November of 2005. Unfortunately, all of my meticulously-photographed stages of progress were hosted by a former internet provider that stopped offering residential service a decade ago, so it would appear all of those photos are lost. Here's one we took when we first put the house on the market at the end of 2014 to give you a frame of reference:
I'd never attempted a project of that scale, so my learning curve was a steep one riddled with trail-and-error (mostly error). The new office, however, is half again as big as my old one with ceilings about 16 inches taller. It's not exactly build-a-photo-studio challenging, but it's no day at the park, either. With the completion of my
workbench the other day, I saw no reason to delay any further. Last year, sometime after I finished
The Wife's photo studio, I closed in the large entry to the former dining room, which is designated my office. Over the past 10 months or so I've been purchasing cabinetry here and there with which to build my bookcase upon, so as to not break the bank all at once. I started with an unfinished corner cabinet on clearance from McCoy's--spruce, I think. Then I picked up unfinished horizontal, double cabinets from Home Depot when they were on sale--these are oak. As happened
back in 2005, I ran into some logistical problems. The cabinetry I'd planned on using wouldn't fit in the space I had available, and the pieces I did need had been discontinued. Great. Scrounging the internet, I found some building supply clearance outlets in the DFW area that had two narrow, vertical cabinets just the right size for me. It was a hassle and shipping costs more than made up for any savings I realized by getting discontinued cabinets, but hey, beggars can't be choosers.
But some mistakes are there to be learned from. In 2005, I picked up a polyurethane stain that looked great in the store, but turned out to be
pretty darn ugly when applied. I ended up having to sand everything down, which was an unpleasant experience. I was never able to get the issue resolved to my satisfaction. Also, back then, The Wife and I were wary about dark woods and stains, since our house didn't have an over-abundance of window light. I eventually went with a golden oak stain, which is the default neutral wood color for all subdivision construction. So this time around, I wanted to avoid that cheap look and go with a deeper, richer, warmer wood color. We really loved the flooring at the old house, but since that has naturally been discontinued, I found another type of laminate that is very similar and set out to try and come up with a stain that would come close to matching it. I picked up one can each of Minwax and Rustoleum's Dark Walnut stain, because they both looked great in the store. But remembering my folly with the cherry wood stain before, I experimented on pine plywood first. It's a good thing I did:

The big board on the right was my initial test subject. The Minwax, on the bottom, looked like black ink spread over white wood, imparting impressive grain texture but zero underlying color. The Rustoleum, on top, boasts of incorporating advanced nano-sized pigments for better penetration. What it did was give me brown wood. Chocolate brown. Gunshoe brown. Buster Brown. Crayola brown. Neither looked like the in-store samples. Neither was acceptable. What I needed, I realized, was a layered approach. I needed the raw wood to already have a deeper base color so that the dark walnut stain could just focus on accenting the grain. Since the Rustoleum was super-thick and not so easy to work with (and I didn't like the brown color anyway) I picked up a can of Minwax's lighter "Special Walnut." Using another scrap of pine (middle, above) I stained it with Special Walnut, then after a three-hour break, went over it again with Dark Walnut. The result was very much closer to what I wanted. There's a lot of glare in the image above, but the image below shows the color match between the pine and floor sample much better. In reality, the color difference isn't even this noticeable--the mixed flourescent and flash of the garage really did a number on the white balance in these photos.

Encouraged, I removed all the doors from my accumulated cabinets. Seeing as how oak and spruce differ from pine, the stain could still turn out to be a mistake, so I made the strategic decision to stain the insides of the doors first, just in case.
To hedge my bets even further, I broke down and bought a can of pre-stain treatment, which is supposed to prevent blotches from forming and ensure an even coat of stain. That's never been a big problem for me, but I'm trying to up my game on this one. The pre-stain went on easily and gave it a familiar honey oak hue. The instructions said to wipe off any excess after 10 minutes, but the rag I ran over the wood came away clean.
The next step was to apply the Special Walnut. Using a foam brush, I applied the stuff and was a little worried at first, as it appeared much darker than I expected. Uh-oh. After five minutes I wiped a section of one door and found that the wood hadn't absorbed very much--it was still quite light, so I left the remaining stain on the others for 15 minutes before wiping. It looked quite nice. Were I not going for a specific look, I might've stopped right there. As it was, I set the doors aside for a three-to-four hour dry.

Next up... hoo boy. Remember how I said the first bit of cabinetry I got was a corner piece made of spruce? Yeah, well, this bad boy is already becoming a pain in the ass. For the first time I realized that it does not have molding on the front of the door--it's simply flat, so visually it stands out quite obviously from the other cabinets. I'm not sure what I will do about that--I may get some boards and try to router out an approximation of the trim for it. Will have to think on that. Of more immediate concern, though, is the fact that spruce doesn't really want to take the stain, even after I sanded the surface to remove accumulated grime (it'd been a display model, after all). The grain's not differentiating as much with the spruce as with the oak, so I have a strong suspicion this one's going to give me trouble this entire build.

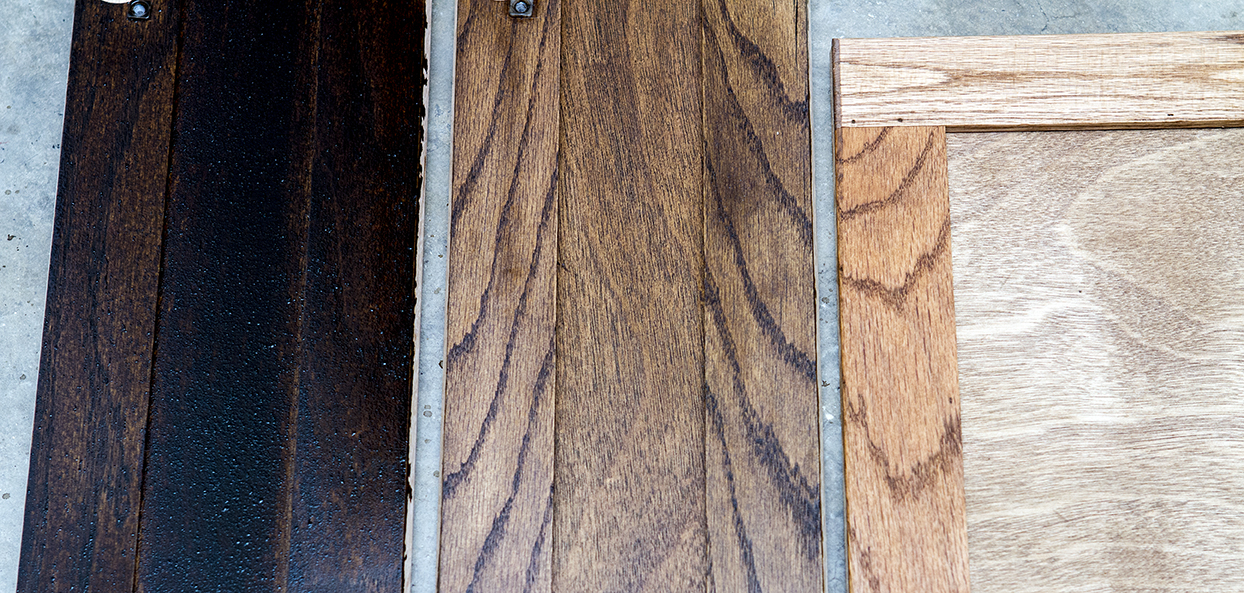
After the requisite drying period, I broke out the Minwax Dark Walnut and applied it with a foam brush. I wiped one spot after 5 minutes, saw that the underneath was still relatively light, so left it on for the entire 15 minutes before wiping away. Jumpin' Jehosaphat, that surely does look pretty! Below, right, is the wood with only the Special Walnut applied, and left is the wood with the Dark Walnut soaking in. The middle piece is the finished product. To say I'm pleased is an understatement. There's a tonal depth to the wood that my single stain applications don't come anywhere close to matching. Hopefully, I'll be able to get the fronts of the doors completed tonight and turn my attention to the cabinets themselves this weekend.
Now Playing: Prince The Black Album
Chicken Ranch Central


No comments:
Post a Comment