Welcome to a super-sized edition of Jayme's tiki bar build-along! This part of my project dates back a couple of months, but I thought it'd work best to present the whole thing here in one installment, start-to-finish. But before we get to that, take a look to the right. That's one of my banana plants fruiting. Pretty cool, eh? Unfortunately, I have no idea what variety it is. I know what it is
supposed to be: Dwarf Brazilian. But I found out after the fact that the nursery I ordered it from is notorious for mislabeling plants. The other two I got from them are Gold Finger and Dwarf Orinoco, but I'm suspicious of those as well. In any event, this bunch of bananas might be ready by January, if a freeze doesn't get them. I cut the flower off about a week after I took this photo in the hopes that the plant would put more energy into maturing the fruit. We shall see.
Now back to the tiki bar! Throughout our dive-in movies this summer, one thing that became obvious is that despite adding the back bar, I really underestimated the need for drinkware storage in the tiki area. Mugs and glasses stored on the tiki bar's shelves get dusty pretty quickly, and if there's an event where I need glasses for multiple people's drinks, I don't really have any place to put them. I'm starting to get a little tiki mug collection going, and there's no place to display those, either. The solution that grew upon me over the course of the summer was to build two cabinets for wall over the back bar. Initially, I thought this wouldn't be possible, because they'd have to go right under the light sconces. The light is fairly dim, and I didn't think blocking it would be a good idea. But I hit upon a solution to that. Using 1" thick Ponderosa pine boards from McCoy's, I sketched out two cabinets that were 10" tall and 8" deep. Because there is a different amount of available wall space for each, one is 36" wide while the other is 42" wide. I went with the boards from McCoy's because they have a much smoother finish than similar boards from other lumber yards. I cut all the pieces out, and this is the result:

This being a tiki bar, a plain side panel on the cabinets wouldn't do. Tiki bars are all about elaborate detailing and texture and drawing the eye. So I decided I would go with a hibiscus flower on the ends, that being the classic tropical blossom representative of Hawaii, Polynesia and the Caribbean as well. I looked at a bunch of designs online and cherry-picked elements I liked, tweaking them to get an image I liked. I printed it out and transferred it to a piece of poster board, which I cut out with an X-acto knife to make a template pattern.
Then I sketched the pattern onto the end pieces. I guess that part's self-explanatory.
Once the pattern was marked down, I attacked it with a Dremel to carve out the outlines and fine, inner details. I used my trim router to carve out the remaining wood. The first one took me almost an entire evening to do, learning as I was. The next evening I knocked two of them out in the same amount of time.
Once I finished all the end pieces, it was time to get serious about the cabinet doors. Early on, because these were to be display cases, I decided to have sliding doors. I've seen such before, but it's amazing just how little information was available on the DIY sites that populate the interwebz. The cabinets would have two plexiglass doors that slide in parallel. The most solid sheet of plexiglass readily available measured .22" in thickness, so I went with a quarter-inch router bit, set at 1/8" depth for the bottom and sides of the cabinets, and a quarter inch deep for the top.
Yes, it was very stressful making sure the routered grooves aligned. I was using a guide, but that's never 100 percent guaranteed to work right.
To make everything work, I needed the two plexiglass doors to slide in parallel. Which meant I had to router two grooves that ran in parallel, very, very close to one another. This was very stress-inducing. Even with a guide, the routher bit would catch on the wood occasionally and jerk, potentially ruining everything. I kept a
very tight grip and worked it slowly. The finished tandem slots weren't perfect, but they were close enough.
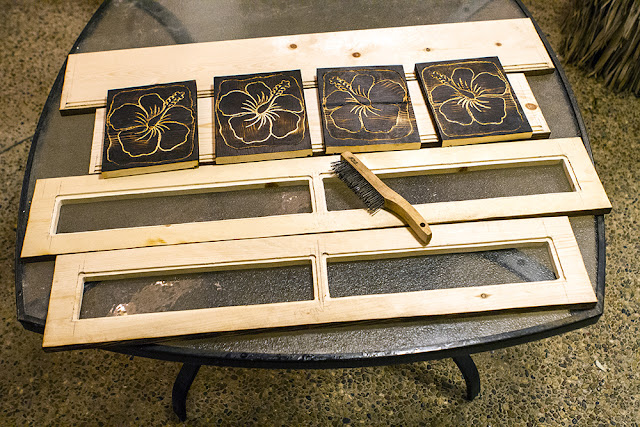
Once all the routering was completed, I took my butane torch and scorched the hibiscus carvings and the front edge of the boards. Once everything was suitably carbonized, I took a wire brush and scrubbed off the char and soot, leaving an interestingly textured surface evocative of the old Witco designs. The next step was to glue (Titebond II) all the pieces together. For each joint I drilled a pilot hole and sank in a wood screw to hold it together. Once the glue set, the cabinets would be pretty darn solid.
Not all of our drinkware consists of tiki mugs. In fact, because of the close proximity to the pool, our go-to barware consists of acrylic poco grande glasses (think half-size hurricane glasses). Actual glass is a no-go in the bar area. The poco grande stemware needs a place to hang out as well. After some thought, I realized the entire bottom of my cabinets was going unused. I took the remaining wood left over from the cabinets themselves and cut a bunch (I forget how many) 3"x8" rectangles. Then I ran those pieces through the table saw, like this:
After running them through on each side, I flipped them down and ran them through again, like this. See where I'm going yet?
Once all the pieces were cut into a T, I put a rounded trim router bit into my full-sized router. Normally, one would use a router table for this, but since I haven't built a router table yet, I winged it, laying the router on its side, locking the power button in the "on" position, and running the pieces across it by hand to get a nice beveled edge. Yes, mistakes were made, but I'm not going to talk about those. Suffice to say that it was a good thing I had extras. I also hand-sanded the rough spots, of which there were quite a few.

The next step was to stain everything with Minwax's "Special Walnut," my go-to stain for the rich, dark, warm look. The whole process is tedious and not terribly dramatic, so I didn't take any photos. Trust me when I say I did this. I also put a coat of water-based spar urethane on all the exposed surfaces. I did this because I was out of regular, oil-based spar urethane. Go with what you've got. I will, at some point, go back and add additional coats of oil-based spar urethane, because that gives a nice amber glow, whereas the water-based is colorless and clear. Fortunately, one can top-coat water-based with oil-based. The reverse is not true. All that accomplished, I spaced the glass-holder Ts out along the bottoms of the cabinets.
Stop me if you've heard this before: I drilled a pilot hole in the center of each T, then used a bigger bit to cut a countersink hole over the pilot hole.
I ran a bead of Titebond II along the bottom of the T, then secured it to the bottom of the cabinet with a 1.25" wood screw. Those glass holders are on there solid.
Because I'm obsessive, I went over all the screw heads and covered them with wood putty. Remember the countersink holes? This is why I put those there--so the screw head sits below the surface of the wood.
The next day, after the putty had fully dried, I went over the holes with fine-grain sandpaper. It was either 220 or 320 grit, I can't quite remember. I suspect it was 220 grit, because at this point I've been working on these cabinets for more than a month and I'm getting very impatient.
After sanding smooth, I used a folded paper towel to dab on Minwax "Dark Walnut" stain. Why "Dark Walnut" when I'd originally used the lighter "Special Walnut"? Because stains show up lighter on wood filler than on actual wood. The "Dark Walnut" gave me a closer match. The next day, once the stain was fully dry (nothing about this project went quickly) I added another coat of the spar urethane to sanded/puttied/stained surface.
At this point I entered uncharted territory. I've never worked with plexiglass before. I was nervous and cautious--not least because the sheet of plexiglass I'd gotten for this cost more than all the other materials combined. I carefully measured the cut, then double- and triple-checked it. I clamped down a steel yard stick as a guide, then ran the plexiglass cutting tool along the intended cut.
Plexiglass is weird in that it's very strong--much stronger than glass--but also very soft. The cutter was similar to an X-acto knife, except it has a barb to dig into the plexiglass. To make a cut, I drew it across many, many times. With each pass it bit a little deeper, gouging up coiled shavings.
Once I'd cut about halfway through, I simply snapped the piece off. I was surprised at how clean the breaks were. I had a couple of small pieces turn out a little jagged, but that was a result of my getting impatient and trying to break the piece off before I'd cut a deep enough groove first.
This is my solution for the light sconce problem, mentioned up at the start of this blog entry. I used a jig saw and router to cut skylight windows in the tops of both cabinets. Then I cut plexiglass windows to fill those holes. Now, when the lights are on, they illuminate the contents of the cabinets from above, and the light spills out the front. I've seen a lot of people add LED light strips to their shelves to illuminate their tiki mugs. This saves me a little of that trouble.

Once cut to size, I inserted the sliding plexiglass doors. The top grooves are deeper than the bottom, so that I can push the plexiglass all the way up into the top groove and have enough clearance to slip the bottom into the lower groove. But having those nice clear doors does me no good if the interior fills up with mud daubers, spiders and the like, so I had to seal that gap between the doors somehow. The solution? Self-adhesive pile weatherstripping. I cut to size and placed one strip on each section of door, facing toward the opposite door. It's not an airtight seal, but it should keep most dust and critters out.

I had one remaining challenge. Those plexiglass doors slid open and shut just fine, especially once I sprayed the grooves with furniture wax. But fingerprints showed up readily. Fingerprints are ugly. I didn't want to have to spend all my time cleaning the doors, so I needed handles. I looked at building supply and home furnishing stores for something appropriate, but nothing seemed right. Then I thought to myself, "Why not make your own?" And that's what I did. I had a pine branch in the garage I'd picked up during one of my son's campouts last fall. I had a vague notion I'd carve something into it at the time, but I had no idea what. I cut two 3.5" sections from it, then split those lengthwise into halves. Then I ran then over my power sander to strip away the bark. Looking back, I should've sanded more to strip away all of the cambium as well, but live and learn.

I took a pencil and sketched tiki faces on them. I poked around the interwebz for inspiration. They mostly inspired by Hawaiian tikis, but I mixed and matched different design elements and added some interpretations of my own, so I don't think anyone can point to one and say, "That's Ku" or somesuch. These are my interpretations of various thematic elements, artistic license and all that. Alas, I don't seem to have taken any photos of the pencil sketches. They didn't last long once I attacked with the Dremel. This is where I found that the cambium fuzzed up and made a brittle, splintery mess. It was really hard to see what I was doing with that going on. Fortunately, all of that cleaned up nicely once I scorched them.
Then came the obligatory walnut stain and spar urethane coating.
I wanted them attached to the plexiglass doors as a floating mount, so that meant more drilling. I cut out two holes in each tiki handle deep and wide enough for a brass nut, then set them in place with a dab of JB Weld epoxy. On a couple of these the epoxy oozed into the center, and I had to Dremel it out once it dried so the screw would fit properly.
Then I measured and taped each handle into position.
This is what it looked like from the other side. Duh. I marked the center of each nut with a permanent marker dot.
I drilled through the plexiglass with a bit large enough to accommodate the screw. Drilling plexiglass was challenging, because although it's soft, it'll melt if you drill too fast from friction. So I had to drill through it like I was Goldilocks--not to fast, not too slow, not too hard, not too soft. Once I got the first hole through, I attached the handle using a rubber washer and brass washer on either side of the plexiglass. I recentered to make sure the original dot was still valid (it wasn't always) then drilled the second screw hole.
Yeah, this is pretty much what it looked like once the second hole was drilled.
And this is the tiki handle fully secured in place.
Floating tiki handle No. 1.
Floating tiki handle No. 2.
Floating tiki handle No. 3.
Floating tiki handle No. 4.
Finally, after all that work, here is the first cabinet, fully operational:
And the other cabinet, for comparison's sake.
I have to say, the end result exceeded my expectations by a wide margin. They look pretty darn cool up there above the bar. If someone didn't know any better, they might be tempted to think I actually knew what I was doing. But we all know better than that, don't we?
Now Playing: João Gilberto Chega de Saudade
Chicken Ranch Central


I'm in awe of your skills.
ReplyDeleteObsession and/or compulsion can make up for a lot of shortfalls in other areas...
Delete