It's hard to believe my last build-along post came way back in June! It's not that I haven't done any work on the Lagoon of Mystery, but much of my efforts have been piecemeal that don't make for much of an update. I have a few cool additions to share now, however, starting with this guy, who The Wife gifted me for my birthday:
I have to say, the Gill-Man looks right at home in my Lagoon, even if it isn't black. This is ostensibly a Halloween decoration. It's a dense, mold-injection polystyrene foam, so it's relatively light, but somewhat durable as well. The detail on this sculpt is pretty impressive, and the paint job is mostly excellent (more on that in a moment). I wanted to have him breaking through the wall above the stereo cabinet, so I started the installation by taking old, scrap bamboo weave and cutting and painting it to achieve the desired "bursting" effect. Then I stapled it to one of the furring strips I have backing the bamboo weave on the wall (note that this is a new addition as well--that wall was exposed siding for most of the year).
I measured, drilled and installed wall hooks to support the Gill-Man. Despite my measurements, I had to reposition them a couple of times before it would sit right.
There was no obvious way to wall mount him, despite the packaging suggesting such a course of action, so I ended up epoxying in two eye hooks into the hollow back.
I connected galvanized wire to the eye hooks. It took a bit of trial-and-error to get the length correct. It doesn't sit entirely flush against the wall, but it's fairly close.
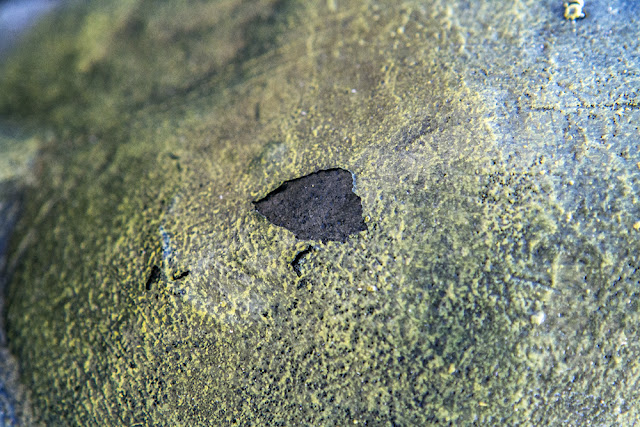
Now we get to my big disappointment. That nice, detailed paint job? It was peeling up on the crown of his head. That bald spot was about the size of a nickle, but the surrounding paint had separated from the foam in an area about 5 times as large. I thought about sending it back, but that meant serious hassle. And I didn't want to let go of my Gill-Man.
Maybe I could fix it on my own. And add some unique character while I was at it. Fish hook, anyone?
I cut the damaged paint away with a razor blade.
I mixed up some epoxy ("Strong stuff").
I applied the epoxy over the hook and the damaged area of paint. Then I let it dry and cure.
The next day I sanded the epoxy and started applying layers of acrylic paint in various shades of green. It took a good deal of mixing and layering to approach the mottled look.
I was not completely happy with the final results. Fortunately, the new paint isn't nearly so bright or obvious as it appears in this image. The color shift is much more subtle, and when the Gill-Man is mounted high on the wall the difference is imperceptible.
[UPDATED] I left the following photo out of my initial post because I am dumb. Gill-Man, as cool as he is, is still made of polystyrene foam. Which is vulnerable to UV degradation. I've seen that even under the covered patio, reflected UV light still does a number on plastics. And I have no idea what varying humidity will do to it, either. So as a hedge against these forces of nature, I coated the Gill-Man with several coats of water-based spar urethane. Why water-based? Well, it goes on clear, whereas the oil-based type has an ambering effect. Hopefully this will offer enough protection to ensure the Gill-Man is with us for many years to come. And while I'm at it--just look at the detail on this sculpt! For a cash-grab, somebody put a serious amount of effort into this production.
Every spring we have problems with barn swallows attempting to build mud nests in the shelter of the patio roof. This does not mix well with our tiki bar decor. Artificial owls have proven to be the best at scaring away the swallows, but now I find myself wondering if the Gill-Man might do a better job.
Doesn't he look great? Note in those photos the dark wood trim dividing the bamboo weave paneling on the top half of the wall from the vertical tortoise shell bamboo tambour on the bottom half. All that went up so that Gill-Man might be installed properly. I hate to admit it, but I actually began routing that wood trim a year ago. Other projects intervened, and I set it aside, not even half-finished. I didn't expect it to take the better part of a year to get back to it. Over time, the parts that I'd originally carved out discolored so as to match the unmolested wood. It's funny, because my newer cuts stand out as bright white! I had to also carefully measure a cutout so the trim would fit around the built-in stereo cabinet.
Each piece of middle trim has a few design elements that set it apart from previous trim pieces I've cut. They're all a little different, even though certain design elements repeat. It's my modest effort to always have something novel for visitors to discover.
To make the cut-out, I used a jig saw. I did not use a guide on this cut, because reasons. The result was a cut that was mostly straight, but awkwardly lumpy when placed up against the stereo cabinet. I fixed this problem through application of brute force--I hit those lumps with the power sander until they were no more. Problem solved.
Next, as I do with all the wood trim, I torched it. After the wood was thoroughly scorched, I scrubbed it with a wire brush (not shown) then stained with Minwax Special Walnut (not shown) and sealed with two coats of spar urethane (also not shown).
Before I put up the trim, I had to get the tambour panel up. I really, really like the tortoise shell style. It just gives a nice, visual texture to the layout. I used trim nails (and a drill to make pilot holes) to attach the tambour to the wall, then used my Dremel with a cutting disc to accommodate the rows of switches. This was probably the easiest step of the whole build.
The switch box was quite dirty. There were mud dauber nests in there. At some point, I will change out those old, white switches with dark brown ones. I've already replace the switch plates.
And this is how all the paneling looked prior to the finished trim piece being installed. Scroll up to see the finished scene. Normally I try to do these in sequence, but how could I not lead off with the Gill-Man?
The Gill-Man was a fun addition, but it had never been part of my master plan for the Lagoon of Mystery. This next addition is a huge step toward fulfilling that master plan. As I've said before, the Lagoon of Mystery is primarily occupying a 65' covered patio. Thus far, we've tikified about half of that covered space. The farthest end, below, remains mostly untouched. I use it for my work area and it's normally somewhat cluttered. When we have gatherings, nobody goes there, because there's no reason to. My grand vision, however, was to have this as the "cool spot" to hang out. I call it "Mermaid Cove" because of the silhouette painted on the ceiling. I wanted to install a circular restaurant booth here as a sort of physical statement "This is the end of the tiki bar." The only trouble was that new booths are crazy expensive. I'd resigned myself to build one, but I couldn't find any plans online that matched what I envisioned. Even with plans, the build would tax my modest carpentry and upholstery skills.
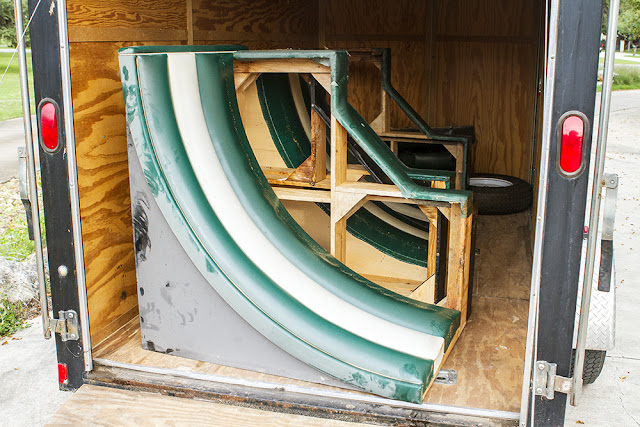
Enter the miracle of Craig's List. By sheer, dumb luck, I discovered a recently-closed Fuddrucker's in Houston (I love their burgers, so this is kind of bittersweet) was selling off their restaurant booths. What's more, their asking price was less than the cost of lumber to build my own. Wow. So last Saturday I drove from New Braunfels to Columbus, borrowed my brother's trailer, drove to Houston, loaded the trailer with sections of restaurant booth, drove back to New Braunfels, unloaded, then returned said trailer to Columbus. I got home around 10:30 p.m. having logged approximately 500 miles. I ached. But I had my booth. Totally worth it!
This is how it looks in situ. Pretty cool, huh?
And another view. I am currently building a table in the style of my previous cocktail tables for the booth, which will look spectacular once in place. I've decided to build a (modestly) raised deck for the booth to rest on to enhance the sense that Mermaid Cove is a distinct location unto itself. What to do with the opening to the yard beyond is starting to come together in my mind, involving a combination of bamboo poles, thatch and Chinese jade breezeway tiles. All of that lies in the future, however. Currently I am weatherproofing all the wood surfaces with my go-to sealant, Flood CWF-UV (natural clear). Those open areas around the back of the booth? I plan to close those in and turn into storage cabinets through the strategic use of hinges and magnet locks. I've done some measurements and sketches, and am convinced I can thoroughly tikify this booth before I even think of replacing the vinyl with tapa pattern (which, initially, I thought I would have to do first thing). Can you tell I'm excited? I'm excited.
Alas, there's no such thing as a free lunch. As good a bargain as this booth was, it did not come without drawbacks. This was a restaurant booth, after all. It seems like 20 years' worth of food crumbs, soda spills and grease from Fuddrucker's had found its way into every nook and cranny. All of that hand to be cleaned out.
Despite concerns about water damage to the plywood, this was too big a job for me to tackle with simple elbow grease, so I broke out our pressure washer. Even with that furious spray, some of the caked-on garbage was reluctant to let go. The "white" vinyl cushion on the seat was particularly striking. A determined spray revealed that it wasn't white at all, but rather white underneath with an embedded patina of grey dirt and grime. Yuck!
The lower I went, the nastier it got.
The slider/foot rests for the booth were old, worn and rusty. I needed to keep the booth elevated so the wood wouldn't be in contact with the concrete, so I replaced these with new, larger furniture sliders. It's the little things that make a difference. Each booth section took 12 sliders. That adds up.
Once all the booth sections dried in the sun, I moved them back into place on the patio and gave the whole thing a once-over using 409 to remove all remaining grease and grime. Despite the pressure wash, there was a lot of nasty stuff left. The good news is, the booth is now cleaner than it has been in 20 years and ready for whatever comes next. And I have to admit, it just feels cool sitting in it.
Now Playing: Pink Floyd The Journey Suite
Chicken Ranch Central


Wow. Especially The Creature.
ReplyDeleteAwesome!
ReplyDelete